1 Introduction
1.1 Overview
This guide explains how to play an alert sound with SAFR Actions based on some event criteria such as person of type threat detected.
1.1.1 About Sounds on Windows
A limitation of Microsoft Windows is that programs that run as a Windows Service cannot interact with I/O devices such as the speaker. This means that SAFR Actions cannot invoke sound files when it is running in its normal state as a Windows Service. To play a sound as described in this article, you must run SAFR Actions from command line.
This article explains how to set up SAFR Actions using the Windows Task Scheduler so that SAFR Actions can be automatically started when a user logs in. Even when running as a Windows Task, SAFR Actions cannot play sounds unless it is allowed to run as a user application. In this case, a user must be signed into the computer. This guide instructs how to configure the Windows Task correctly so that SAFR Actions is able to play sounds.
1.1.2 Prerequisites
This document assumes you have prepared your SAFR system for matching faces and generating the events of interest. For example, you may have configured SAFR on one or more cameras to identify persons from a watchlist and generate an action when a person from the Watchlist is matched. If needed, refer to SAFR Documentation at http://docs.real.com for more information on setting up.
This document also assumes you are familiar with SAFR Actions, how to create SAFR Actions configuration files, where to place SAFR Actions scripts and how to troubleshoot SAFR Actions. For more information about SAFR Actions, see “Running a Script with SAFR Actions.
1.2 Required Hardware and Software
1.2.1 Required Hardware
-
A PC to run SAFR Actions. This PC should operate 24x7 to monitor for new events.
- If using SAFR On-Premises server, then SAFR Actions is installed with SAFR Platform installer and can be run on the same machine as SAFR Server.
- If using SAFR Cloud, then a separate PC is required to run SAFR Actions.
1.2.2 System Requirements
Following are the minimum system requirement to run SAFR Actions
- Intel i5 CPU or equivalent
- 8 GB RAM
- 100 GB HD
1.2.3 Required Software
- SAFR Platform or SAFR Desktop client which can be downloaded from SAFR Download Portal (http://safr.com/portal > Downloads).
SAFR Actions is installed with SAFR Desktop or SAFR Server. Only run SAFR Actions on a single PC or actions will be duplicated.
1.3 Required Files
Following batch file is used in this guide to play a sound with SAFR Actions. This file should be downloaded and placed in SAFR Actions scripts directory as described below.
2 Install the Batch File in Scripts Directory
To generate a system sound, use the file provided above under Required Files described below.
- Download systemsounds.bat using the link above.
-
Remove any security restrictions on the file such as below under File Properties:

- Save the file to C:\Program Files\SAFR\RealNetworks\ares\scripts
3 Solution Setup
3.1 Prepare SAFR Actions Config
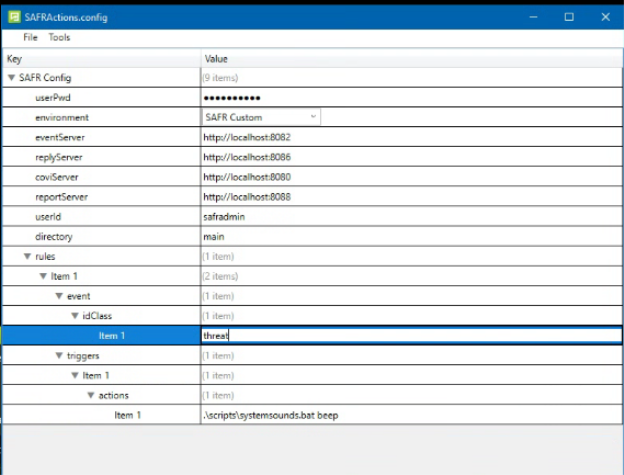
Prepare the SAFR Actions config file for playing a sound as described below.
- Open SAFR Actions
- Use the “+” and “-“ symbols to add and remove properties to match the screenshot below.
- Clicking "-" deletes that row or entire section
- Clicking "+" adds a row following current row
- Some items such as "idClass" allow for one or more items. After adding the property, click "+" to add each item.

- Select File > Save to reload the new configuration.
-
Check SAFR Actions log file to ensure there are no errors
- Open C:\ProgramData\RealNetworks\SAFR\ares\logs\ares.log
- Check that the last line of the file is as follows:
Ares v3.3.033 started!
Listening for events...
3.2 Stop SAFR Actions Windows Service and Run as Command Line
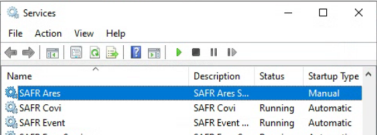
- Open Windows Services control panel and scroll to SAFR Ares
- Stop the SAFR Ares service and configure its Startup Type to Manual as follows:

- Start SAFR Actions command line as shown below
cd "C:\Program Files\RealNetworks\SAFR\ares"
..\jdk\bin\java.exe -jar ares.jar SAFRActions.config
NOTE: Working directory MUST be ‘ares’ folder in SAFR Application directory
- SAFR Actions should start up and show the following output on the command line:
Ares v3.3.033 started!
Listening for events...
- Set idClass as “Threat” for a known person record
- Have that person appear in front of camera to trigger an event of type Threat
- You should hear the computer where this script is running play a sound.
- Once verified, set up a Windows Scheduled Task as described below to automatically run this command in the background.
You can also use fully qualified paths as follows:
cd "C:\Program Files\RealNetworks\SAFR\ares"
"C:\Program Files\RealNetworks\SAFR\jdk\bin\java.exe" -jar "C:\Program Files\RealNetworks\SAFR\ares\ares.jar" "C:\ProgramData\RealNetworks\SAFR\ares\config\SAFRActions.config"
4 Running SAFR Actions in Windows Scheduled Task
- Open “Windows Scheduler” and create a new Task.
- Under General give a name and set following settings so task runs in background:

Go to “Triggers” and click “New…” and create an “At Log on” trigger as follows:
|
|
|
Go to “Actions” and create a command Action as follows:
|
|
|
Where:
-
Program/script is: “C:\Program Files\RealNetworks\SAFR\jdk\bin\java.exe”
- Quotes should be included due to the space in the path
- When running in Windows Task Manager, the command line to java.exe must be a fully qualified path as shown.
- Add arguments is: -jar ares.jar SAFRActions.config
- Start in is: C:\Program Files\RealNetworks\SAFR\ares
When submitting this dialog, say
Go to Settings tab and configure as follows:

Once created, manually start the new Task. Normally the task will start at when user logs in.
It is normal for a command window to appear. Minimize this window if desired. Alternatively, modify the command to use a Windows Script file instead as described in following article.
https://serverfault.com/questions/9038/run-a-bat-file-in-a-scheduled-task-without-a-window
If the configuration is changed, Start and Stop the Task in order to reload the new configuration.


