1 SAFR – Software House C-CURE 9000 Integration Guide
1.1 Introduction
Deploying and configuring SAFR and Software House C-CURE 9000 will allow SAFR to import C-CURE 9000 person records and credentials to be used on SAFR SCAN face authentication readers. SAFR SCAN is using the imported face image, converted into a biometric signature, to verify a person identity when presented at a SAFR SCAN reader. When a person’s identity has been verified the SAFR SCAN reader transmits the imported Access Credentials to the access control panel via Wiegand or OSDP signaling.
Please note that SAFR will not import a person record if it does not have a card access credential. Likewise, if the access credential is removed from the person record, SAFR will delete the person record in SAFR. SAFR only supports one card access credential per person record. If multiple credentials exist, the most recently updated credential is imported.
For complete SAFR and SAFR SCAN documentation please visit http://docs.real.com.
1.2 Integration Overview and Requirements
Integrated SAFR - SoftwareHouse C-CURE 9000 is available on Windows and Linux.
This guide specifically describes:
- Configure C-CURE 9000 to allow SAFR server to import People and Access Credentials from C-CURE 9000.
- Configure the External Identification Synchronization in SAFR server.
A typical integration architecture:
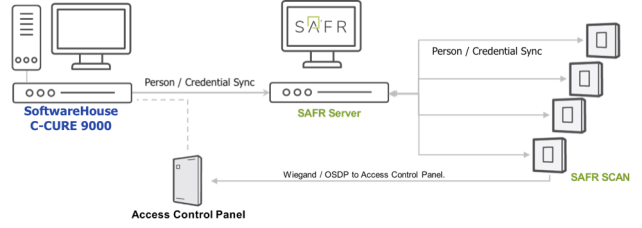
Please note that this Guide does not include the Installation of the SAFR Server (SAFR Platform) or the SoftwareHouse C-CURE 9000.
1.2.1 Biometric Card Reader Integration with iSTAR Ultra Controller
The SAFR SCAN device provides either an OSDP or Wiegand connection back to the control panel for access credentials.
- Wiegand 26 / 32 / 35 / custom
- OSDP 2.2 – RS485
1.2.2 System Requirements
C-CURE-9000 has the following system requirements:
-
C-CURE-9000 Version 2.9 or 3.0
⚠️ Consult SAFR support before upgrading C-CURE 9000 beyond supported versions. - C-CURE-9000 Victor Web Services Enabled
- Port 80 for SSL traffic from SAFR Server to Software House C-CURE-9000 Server
SAFR has the following system requirements:
- SAFR Platform Version 3.27 or later
-
Each machine running the SAFR Server must meet the following requirements:
- Windows 10, Windows Server 2016 or later
- i5 or Xeon Silver 4216 or faster with at least 4 cores allocated to SAFR Computer
- 16 GB System RAM
- 1 TB Storage
- For systems running more than 50 SAFR SCAN, please consult SAFR Technical Support at support@safr.com or http://support.safr.com
1.2.3 Attribute mapping between C-CURE 9000 and SAFR
The following is the current imported and supported attributes/field from C-CURE 9000
|
C-CURE 9000 |
SAFR (People data record) |
Notes |
|
First Name |
First Name |
|
|
Last Name |
Last Name |
|
|
n/a |
Person Type (default “none”) |
SAFR defaults all Person Type records to “None”. |
|
Portrait |
Picture |
|
|
Card Format |
Access Card Format |
|
|
Facility code |
Access Card Facility ID |
|
|
Card Number |
Access Card ID |
|
|
Object Id |
External Id |
1.3 C-CURE 9000 Configuration
SAFR Integration with C Cure 9000 implemented with Victor Web Service.
A C-CURE 9000 RealNetworks license, “RealNetworks - SAFR Biometric – Integration” (Software House Model Number CC9WS-SAFR) is required to be installed on C-CURE 9000 to enable the connection between the SAFR Server and C-CURE 9000. These are described below.
No additional license or software is required on the SAFR server.
1.3.1 Software House Licensing
The required injection script and license is provided by your C-CURE 9000 account representative. For your account rep to generate a license file and injection script you will need to generate a system .xml file in License Manager UI. See image below.
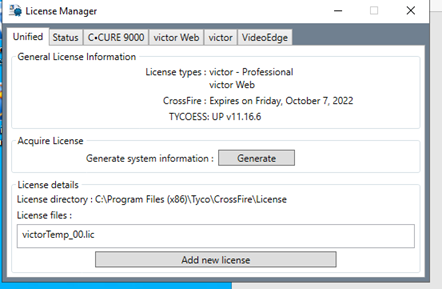
For reference and additional information to the steps below, the installation of third-party licenses is well described in the following video.
https://www.youtube.com/watch?v=OPODytnMWWI
License Installation Steps
- The GUID for the “RealNetworks - SAFR Biometric – Integration” license to use for the injection script below is: eed51559-ac37-42e8-b2e0-64cab1155811
-
Create a batch file (injectscript.bat) at this location C:\Program Files (x86)\Tyco\CrossFire\Tools with the following contents:
InsertLicenseOption /U /V /S:"<<MACHINE_NAME>>\SQLEXPRESS" /N:"RealNetworks - SAFR Biometric - Integration" /A:"RealNetworks" /G:" eed51559-ac37-42e8-b2e0-64cab1155811" /C:2 /P:0
@pause
Replace <<MACHINE_NAME>> (including brackets) with the computer’s Machine Name.-
To get Windows Machine Name, do the following:
- Click on theStartbutton.
- In the search box, typeComputer.
- Right click onThis PCwithin the search results and selectProperties.
-
The machine name is reported as “Device name” as per below.
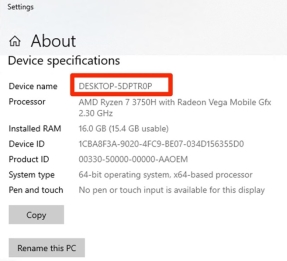
-
To get Windows Machine Name, do the following:
-
As an Administrator, Run the injectionscript.bat batch file created above at this file location: C:\Program Files (x86)\Tyco\CrossFire\Tools.
- Output will look something like this:

- Copy the TLIC to C:\Program Files (x86)\Tyco\CrossFire\License\
- Run License Manager (as Administrator) using the link on Windows Desktop
- Click Add new License, select LIC file
- If the license file is good a dialog box will appear telling you this. Click OK
- Click OK to confirm that services need to be started.
- Restart Crossfire services (Some may already be stopped)
-
Open Administration Workstation from desktop shortcut to confirm license has been applied.
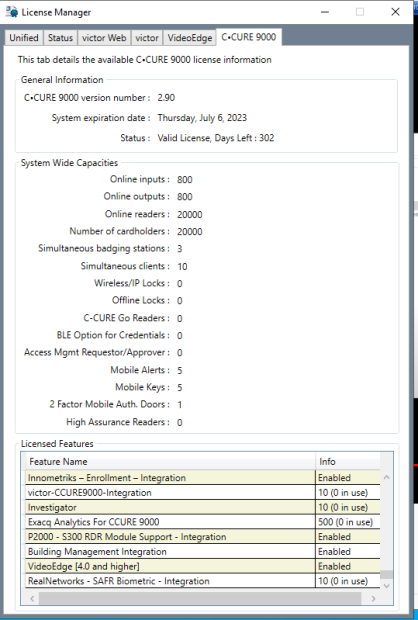
1.4 Set up External Identification Synchronization
To set up identity synchronization between SAFR and C-CURE 9000, do the following:
- Create and new Operator user in CCure or use an existing operator with default system privileges. Make sure to enable the user.
- Open SAFR.
- Click on the Tools menu in the upper left corner of the client and select the System Configuration tool from the drop-down menu.
-
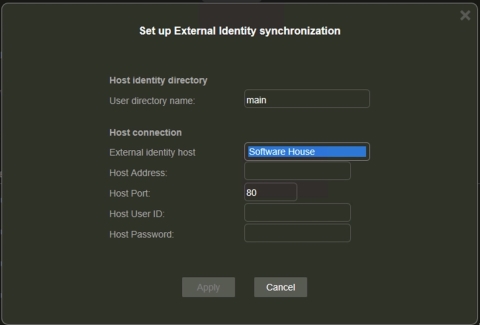
Check the Set up External Identity synchronization box. The following dialogue will appear:
-
Enter information for the following fields:
- User directory name: The name of your SAFR user directory.
- External identity host: Select Software House from the drop-down menu.
- Host Address: The IP address or hostname of the target C-CURE 9000 server
- Host Port: The port number that the target C-CURE 9000 server is listening on.
- Host User Id: The User Id of a user who has the credentials to log into the C-CURE 9000 server.
- Host Password: The Password of a user who has the credentials to log into the C-CURE 9000 server.
- Click the Apply button.
1.5 SAFR Configuration File
External Identity synchronization with SoftwareHouse C-CURE 9000 are customized via configuration file. Available properties are documented in swhouse.properties as described below. To ensure configuration changes are persisted during SAFR upgrades, place any customized properties into the persistent.overrides.properties file.
To view available configuration options along with documentation on their behavior:
-
Go to COVI config directory located in
- C:\Program Files\RealNetworks\SAFR\covi\app\config\covi
- /opt/RealNetworks/SAFR/covi/app/config/covi
- Open ‘swhouse.properties’
- Review documentation for each property
- Copy desired properties from swhouse.properties
- Paste the line into persistent.overrides.properties
2 SAFR / SoftwareHouse C-CURE 9000 Operation Guide
2.1 Synchronizing People
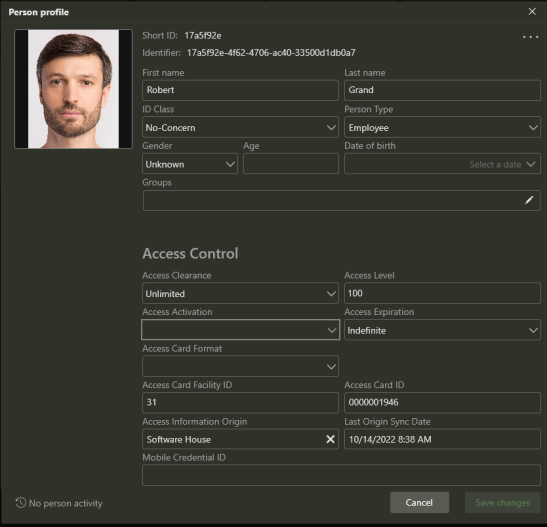
Person synchronization is automatic. Person records and their credentials are copied from C-CURE 9000 to SAFR Server and from there pushed to all readers. Synchronization occurs continually in the background.
SAFR will synchronize people and credentials as follows:
- At initial connection time, all records pre-existing in C-CURE 9000 are copied to SAFR.
- From then on, records added to C-CURE 9000 are copied to SAFR.
- Records in SAFR are NOT copied to C-CURE 9000.
- Changes to records in C-CURE 9000 are updated in SAFR.
- If record is changed in SAFR, a warning is displayed and sync to C-CURE 9000 will be disabled for that record.
- Only records with access credentials and image will be copied to SAFR.
- Removing credentials or the image in the C-CURE 9000 results in the record being removed from SAFR.
- Setting record to inactive in C-CURE 9000 removes the record from SAFR.
Below describes the process (which is automatic).
1. Add a person in C-CURE 9000.
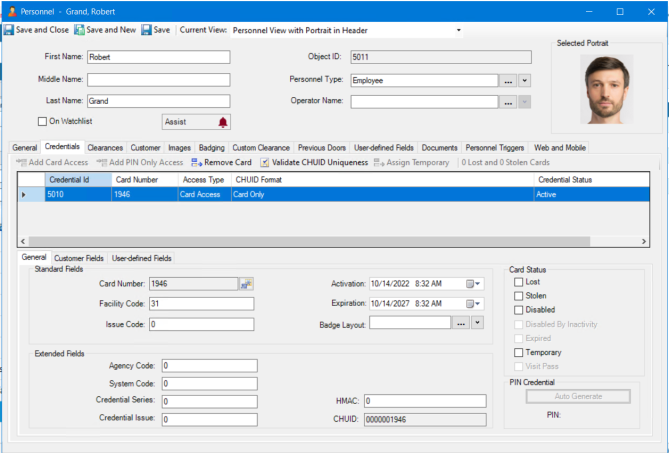
That person record and the corresponding credentials are be copied to SAFR and viewable in SAFR Person Window.
Questions or comments about the documentation? Email us at safr-doc-feedback@realnetworks.com.
1
