1 Introduction
1.1 About this document
This document provides a short introduction to the SAFR Camera. It describes the minimal steps to setup and operate the SAFR Camera. For a complete description of the SAFR Camera and its capabilities, please refer to the SAFR Camera Administration Guide. For more general software capabilities that are applicable to SAFR Camera and 3rd Party Camera Surveillance solutions as well as SAFR SCAN, the Access Control Solution, please refer to the SAFR Software Administration Guide.
1.2 About SAFR Camera
SAFR Camera brings NIST-leading live video face recognition and video analytics features to the edge. Embedded directly into the camera, SAFR utilizes onboard compute functionality for face detection, recognition and related analytics — reducing network traffic and eliminating the need for expensive servers.
While SAFR Camera can operate as a standalone camera with no network connection, it is also possible to take advantage of the powerful multitiered architecture of SAFR Server to provide powerful administration tools. SAFR Cameras can be managed centrally by SAFR Server or SAFR Cloud. SAFR Server or SAFR performs the following roles:
- Distributed Camera configuration (single or bulk updates)
- Firmware updates
- Centralized watchlist management
- Event aggregation for monitoring and reporting
- Event to action workflows
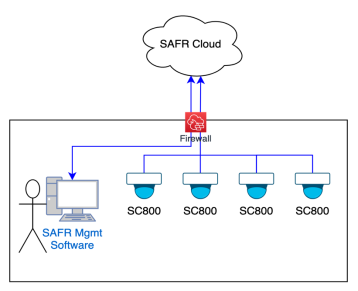
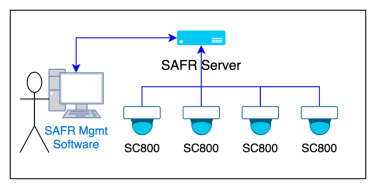
SAFR Camera can be deployed with SAFR Server as a fully on premises solution (all data maintained on your network) or can be connected to SAFR Cloud (no local servers required). The graphic below depicts each of these configurations.
|
SAFR Cloud Deployment (Serverless Deployment) |
SAFR on premises Deployment (Control your data) |
|
|
|
2 SAFR Camera First Run
This section describes powering up and testing your SAFR Camera reader.
2.1 Prerequisites
SAFR Camera requires the following:
- A SAFR Camera
- POE Ethernet or 12V DC power supply
- A PC with a web browser (for configuration)
2.2 Unbox SAFR Camera
Unbox the SAFR Camera. Take note of the MAC Address on the bottom of the camera (you will need this to create our Software Download account.
![]()
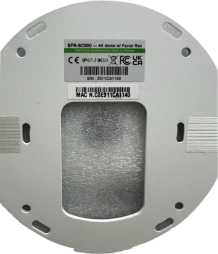
MAC Address
2.3 Power up SAFR Camera
SAFR Camera can be powered via 12V DC or PoE Class 3 Ethernet (15 VDC). The PoE and Power are located on the underside of the gimbal housing. See SAFR Camera Installation Guide for information on accessing these connectors.
With POE connected, perform the following steps to boot up the camera.
-
Connect camera to a PoE enabled switch to power up the camera.
- Alternatively, SAFR Camera can be powered via the 12V Auxiliary power.
- Connect a PC to the same network as SAFR Camera.
- Download and install SAFR Finder from http://safr.real.com/download
-
Run SAFR Finder and locate the camera based on MAC Address obtained above.
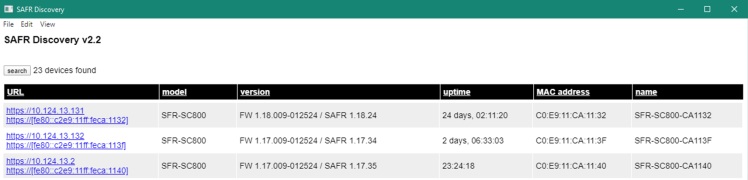
- Take note of the IP address; you’ll need it in the next step.
- The SAFR Camera device defaults to DHCP, but if the device is unable to obtain a dynamically allocated address, then it defaults to 10.10.10.10 or a 169.254.x.x IP address.
-
Open a web browser on your PC or Mac and go to http://IP_ADDRESS (where IP_ADDRESS is obtained from the previous step). This will take you to the SAFR Camera Console.
- You may be presented with a browser security warning about the default SAFR Camera self-signed CERT. This is normal. See SAFR Camera SSL CERT Security Warning in the SAFR Camera Administration Guide for more details.
- If needed, see SAFR Camera Networking in SAFR Camera Administration Guide for information on connecting to SAFR Camera without DHCP and setting SAFR Camera to a fixed IP Address.
-
Click “Set Up System Login” when prompted and complete form.

- The username is always 'admin'
- The email address can be used to reset the device password. See Administrator Guide for details.
- When complete, login with the username 'admin' and the password set in previous step.
![]()
-
Update Firmware to latest (System > Update).
- If online, click “Check for updates” and select latest firmware version
-
 Else, download firmware from http://safr.com/portal > Downloads.
- If the date and time is off by more than a few minutes events may not appear on the timeline making it appear as the reader is not functioning. Check Date and Time on the System tab. An NTP server is strongly recommended to ensure device clock is accurate. SAFR Server version 3.28 or later will correct device time if off by more than 30 seconds.
3 SAFR Camera Web Console Quick Tour
3.1 Live View
The Live View provides a real time view of activity on the camera as shown below.
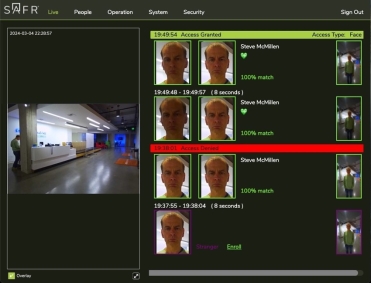
Live video from the camera appears on the left and events appear on the right. Initially you will only see “Stranger” events until faces are enrolled which is covered in the next section.
3.2 Enroll a person into SAFR Camera
Web Console offers 2 ways to enroll a face (SAFR Apps offer many other options)
- Enroll a face from an event in the Live Tab
- Upload face image and enter person name in the Person Tab
3.2.1 Enroll from Camera
- Open SAFR Camera Web Console as described above.
- Navigate to the Live tab
- Have a person get in front of the SAFR Camera.
-
In the live tab, click “Enroll” and enter the user information in the dialog shown.
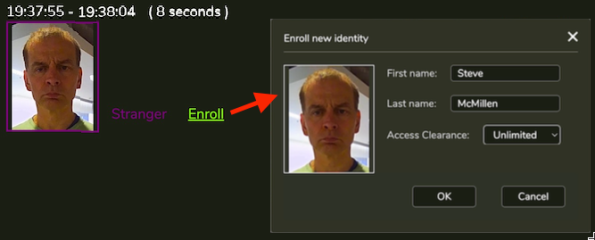
Only first and last name are required. Access Clearance can be left as “None”. - Click OK to add the new person record.
3.2.2 Upload Face Image
- Open SAFR Camera Web Console as described above.
- Navigate to the People screen
- Click “Add” button in upper right
-
In the dialog provided, chose image file and enter user information as shown below.
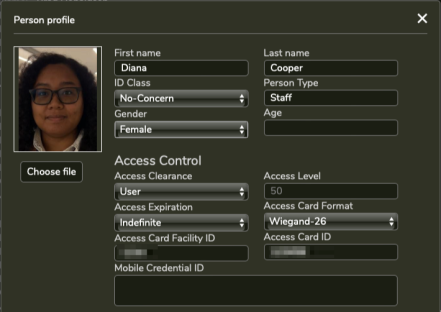
At a minimum, set first or last name and Access Clearance. Optionally provide Facility ID and Card ID. - Click Save Changes and the new person record will be added.
3.2.3 Test Face Matching
- Have the enrolled person stand in front of the Camera.
- The Live tab of the SAFR Camera’s Console should show that the enrolled person has been matched (green border).
3.2.4 Did it work?
Check troubleshooting section below if not.
At this point your SAFR Camera device is functioning and ready to be installed.
3.3 People Tab
People Tab displays any person records that have been enrolled on the camera.
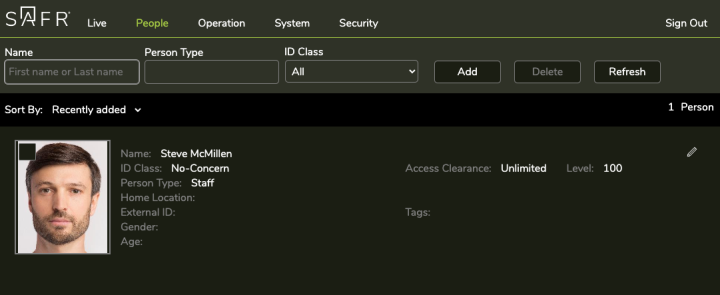
You can use this tab to filter, view or edit person records. Once connected to SAFR Server, any person records on SAFR Server are downloaded to the camera depending on your filter settings. By default, for privacy reasons, face images are not downloaded to the camera but face matching will function as normal.
3.4 Operation Tab
In this tab you will find settings to configure camera behavior. These settings are covered in SAFR Camera Administration Guide. Below is a description of the most important options.
3.4.1 Camera Rotation
To set camera rotation, go to Operation > Image > Orientation. This allows you to rotate the camera 180°.
3.4.2 Zoom and Focus
Zoom and focus are available in Operation > Camera. These controls are shown below.
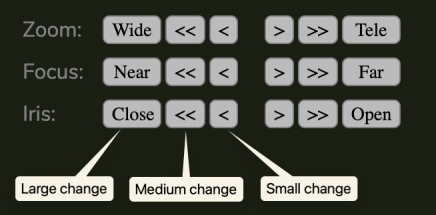
Each of the buttons results in a varying degree of change as noted. Auto-focus is not supported at this time. Focus should be performed after zoom adjustments.
To perform manual focus, perform the following steps
- Start from the largest change buttons (“Near” and “Far”)
- Press Near or Far until camera goes into focus and then out
- Identify the end points where camera is out of focus based on least number of clicks.
- Go to one extreme and go back one half that amount.
- Perform steps 1-4 with the << and >> buttons
- Finally, repeat steps 1-4 with the < and > buttons
Other settings in the Camera tab will be explained in more detail in the SAFR Camera Administration Guide. Automatic settings should provide good performance in most conditions.
3.5 System Tab
System Tab provides settings related to device. These settings are covered in SAFR Camera Administration Guide. Below is a description of the most important options.
3.5.1 SAFR Server
This setting allows connection to SAFR Server for remote management, watchlist synchronization and event aggregation. This will be described in next section.
3.5.2 Video Streams
SAFR Camera provides RTSP video feeds that can be provided to 3rd party software such as a VMS. These are not required for the camera’s facial recognition function.
Settings in the Video streams tab allow adjustment of the RTSP stream settings. To enable RTSP streaming, a password must first be set on the Security Tab. See below for details. Until a password is set, the camera will not allow RTSP connections.
3.5.3 Network
This tab allows the network configuration to be modified. The camera default is DHCP. Network can be changed to static IP Address in this page.
3.5.4 Date and Time
By default, SAFR Camera will use NTP to get its date and time. It default to pool.ntp.org. If not available, you may need to specify an internal time server (preferred) or set time manually. Click “Sync to Computer Time” to set time manually.
⚠️ If the date and time is off by more than a few minutes events may not appear on the timeline making it appear as the camera is not functioning.
3.5.5 Update
Use this tab to update the camera firmware. If the camera is connected to a public network, it will present a list of firmware versions to upgrade if available. Else, download firmware from http://safr.real.com/firmware (make sure to select "SAFR Camera" from the dropdown) and use the “Load update file…” button to load the firmware from the PC local hard drive.
3.5.6 Reset
Use this tab if you wish to perform a software reset. This action will restore factory default settings and optimally clear Network settings and clear enrolled persons and system login. This option is useful if you have forgotten the device password.
?If you have synchronized the watchlist to SAFR Server, watchlist will be restored back to the camera after a reset and reconnecting to SAFR Server.
3.6 Security Tab
Security Tab provides settings related to device. These settings are covered in SAFR Camera Administration Guide. Below is a description of the most important options.
Following are the most useful actions performed in the Security Tab
- Reset Password – Login & Access > Edit System Login
-
Enable RTSP Streaming – Login & Access > Video RTSP Access (set to Enabled and enter password)
- Digest auth is most common. Use this if unsure.
- VPN tab allows SAFR Camera to a VPN for direct access to SAFR Camera Web Console when camera is behind NAT Firewall.
4 Hardware Setup
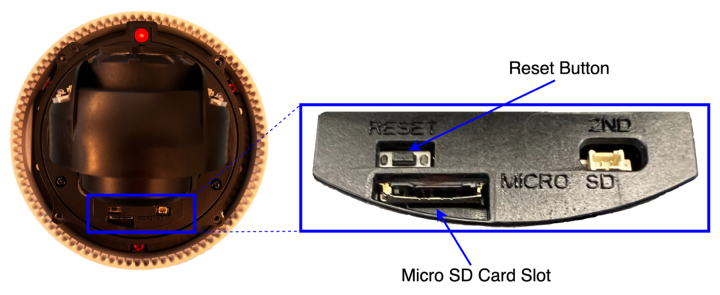
4.1 Factory Reset
Device can be factory reset from the Camera Web Console (System > Reset) or via Reset button shown below.
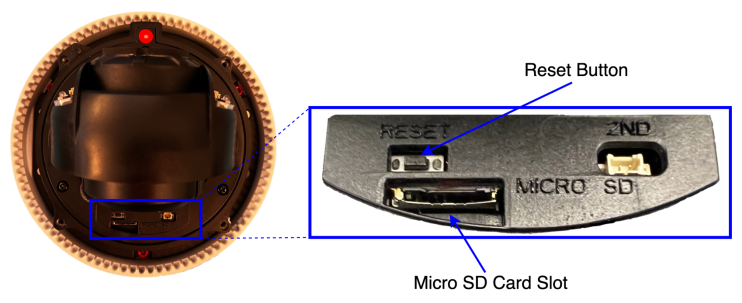
4.2 Micro SD Card
A MicroSD Card is used to store video locally. The Micro SD Card is not included and must be purchased separately.
4.2.1 Installing Micro-SD Card
To access the SD Card, the dome cover must be removed. SD Card
SAFR Cameras support all Micro-SD cards currently on the market up to 2TB (Micro SD, Micro SDHC, Micro SDXC). See SAFR Camera Administration Guide for more details.
4.3 Installing SAFR Camera
See SAFR Camera Installation Guide for information on installing SAFR Camera.
4.4 Mounting Accessories
SAFR Camera comes with the following mounting accessories.
|
ACCESSORIES |
|
|
|
|
|
SRF-CAM-WALL |
SRF-CAM-CAP |
SRF-CAM-JUNCTION |
SRF-CAM-CEILING |
|
|
|
|
|
||
|
SRF-CAM-CORNER |
SRF-CAM-POLE |
SRF-CAM-FLUSH |


5 SAFR Account Setup
This section describes how to create your SAFR Software Download Account. This process can be used to create a trial or paid license. If you are a reseller and need a license for testing or demos, please contact your account manager before submitting request.
5.1 License Deployment Type
SAFR Camera can be used with either SAFR On Premises Server or SAFR Cloud. Using SAFR Camera with an On Premises Server means all your data remains local to the connected server or computer. Using with SAFR Cloud offers you the simplicity of having no in-house computer. SAFR On Premises and SAFR Cloud licenses differ, and the type cannot be changed once created (though data can be migrated between them if needed). Ensure you request the correct license type specific to the deployment type.
5.2 Create Software Download Account
If you already have a Software Download Account, skip ahead to next section.
- Go to http://safr.com/portal
- Click on Sign up to request a new Account.
-
Complete the form to request an account.
- Company name, website, and country for the end user.
- Enter your company email address of the person who will manage the license.
- An email will be sent from safr@realnetworks.com to verify the email address provided.
- Your request is then sent to our sales operations team for processing. You can expect a response typically within 4 business hours. Feel free to contact us at support@safr.com if you have any questions.
- Once approved, you will receive an email with instructions on how to activate your account.
6 Software Setup
6.1 Connect SAFR Camera SAFR On Premises Server
Use SAFR On Premises Server to manage multiple devices centrally and synchronize people from your access control software.
Install SAFR Platform application
- Go to http://safr.com/download.
- Sign in with your SAFR Account
- Select the desired operation system (SAFR Camera supports Windows or Linux versions)
- Download and install the SAFR Platform CUDA 10 Edition.
- When installation is complete, sign into the Desktop Client using your SAFR Account credentials.
NOTE: You can install the software on only one machine. Once installed the software will bind to that machine. If you need to migrate to a new machine, contact support@safr.com to reset the hardware binding on your license.
Connect SAFR Camera to SAFR On Premises Server
- Open the SAFR Camera Web Console as described in First Run above
- Navigate to System > SAFR Server.
- Choose “SAFR Server”.
- Enter the IP Address of SAFR Server and your SAFR Account credentials.
6.2 Connect SAFR Camera to SAFR Cloud
Use SAFR Cloud to manage multiple devices centrally. SAFR Cloud does not support connection to an On Premises access control software. Used SAFR On Premises if this is required.
Connect SAFR Camera to SAFR Cloud
- Open the SAFR Camera Web Console as described in First Run above
- Navigate to System > SAFR Server.
- Choose “SAFR Server”.
- Enter the IP Address of SAFR Server and your SAFR Account credentials.
Sign into SAFR Cloud
- Go to http://safr.com > Customer Portal > SAFR Cloud Web Console
- Sign in with your SAFR Account
Optionally SAFR Desktop or SAFR Mobile apps can be installed for administration and operator monitoring.
See SAFR Camera Documentation at go to http://safr.com > Customer Portal > Documentation for information about SAFR Desktop and SAFR Mobile clients.
7 Troubleshooting
This section describes some of the common issues and how to resolve them.
Face detected but not matching
Symptom: Faces of known people appear as grey ovals. Event reported w/o matching person
Review camera settings:
- Zoom camera to target area such that face size is at least 80 pixels
- Ensure camera is located to get frontal view of face as much as possible.
- If lighting on face is poor, adjust Backlight settings
- If images are blurry, adjust shutter speed
No events appearing
Symptom: Overlays are not appearing and no events are generated.
Check camera date/time. If this value is significantly different from server, events will not appear on current timeline and thus appear if they never existed.
8 Hardware Specifications
8.1 Certifications, Standards, and Ratings
8.1.1 European Community: Safety and Electromagnetic Compatibility
|
CONFORMS TO EN 61000-3-3 EN 61000-3-2 EN 55035 |
|

8.1.2 UL Listing
|
CONFORMS TO |
|

8.1.3 FCC Standard Compliance
Title 47, Part 15 (47 CFR 15) Subpart B Class A
8.1.4 Mechanical Standards
IP65 dust/water Ingress protection rating
IK08 impact rating
8.1.5 Video Compression Technology
H.264 MPEG-4, Part 10 ISO/IEC 14496-10 AVC
8.1.6 Networking Standard
IEEE 802.3af-2003 PoE Standard, Class 3
|
For product downloads and documentation go to http://safr.real.com/portal. By using this product you acknowledge and agree to be bound to the Terms of Service at https://safr.com/terms-of-use-branded-products and the End-User License Agreement at https://safr.com/scan-eula. |
|

Hardware SpecificationsPage 1 of 14