1 Overview
SAFR SCAN integrates easily into existing physical access control systems (PACS). It can replace or augment existing door hardware and integrate into PACS software and panels to use your face in place of or in addition to a physical access card. It does this by leveraging standards-based access control protocols (Wiegand or OSDP) to pass credentials to the panel. SAFR SCAN makes it easy to deploy by integrating into your PACS software to download face images and credentials and using them to authenticate card holders.
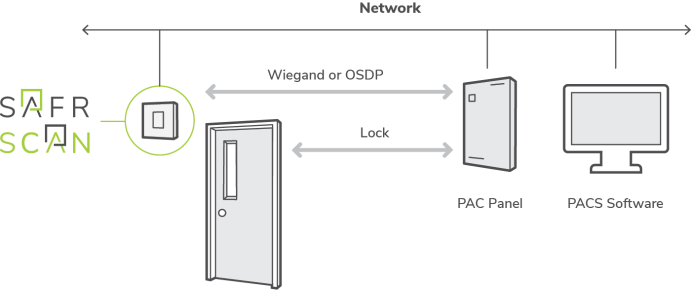
The SAFR SCAN reader uses IP networking to connect to your PACS software and download face images and access credentials. SAFR SCAN uses the face image to match people approaching the device. Users are quickly recognized and using 2 dimensional and 3 dimensional sensors to protect against spoofing with printed or digital photos or videos. Once authenticated, the user's credentials are sent to the panel for authorization.
SAFR SCAN can operate as a standalone device, or as part of a full SAFR system.
1.1 How it works
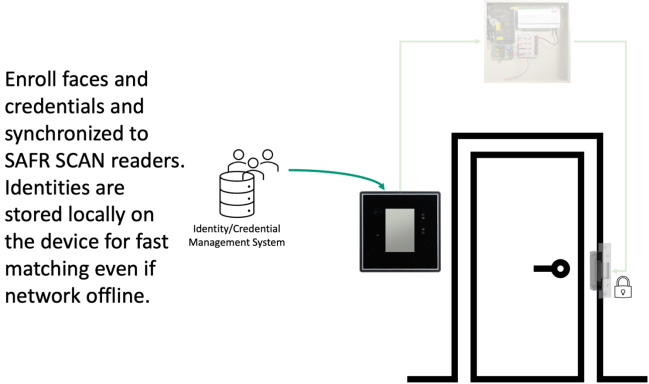
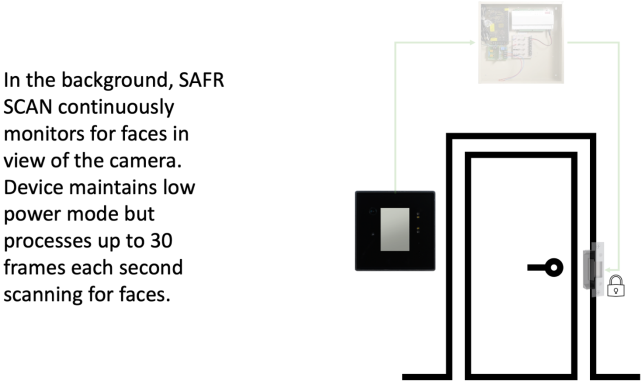
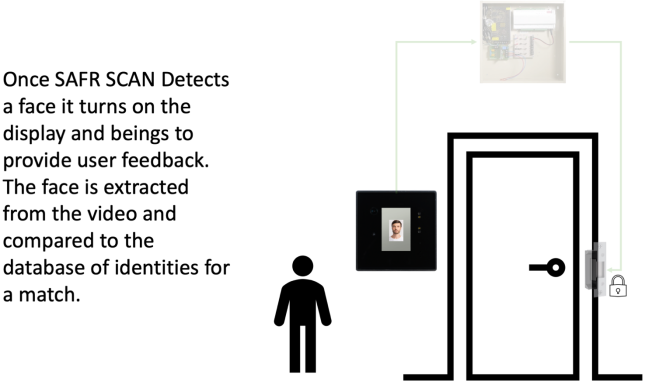
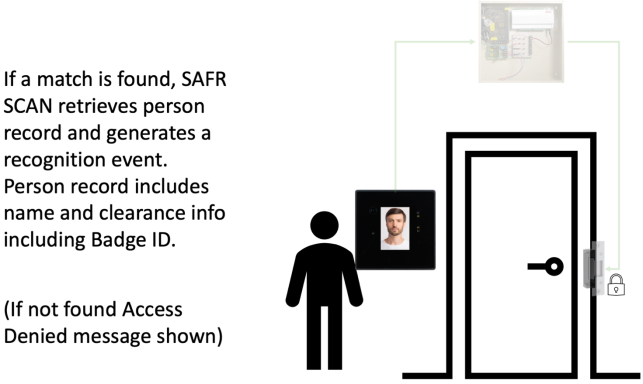
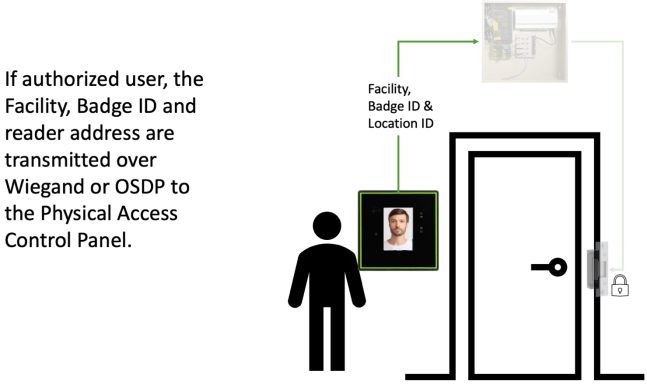
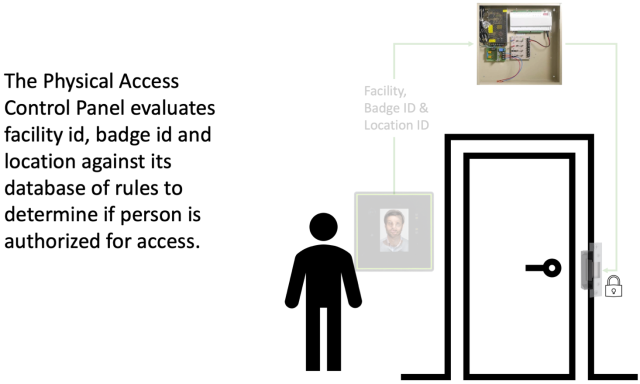
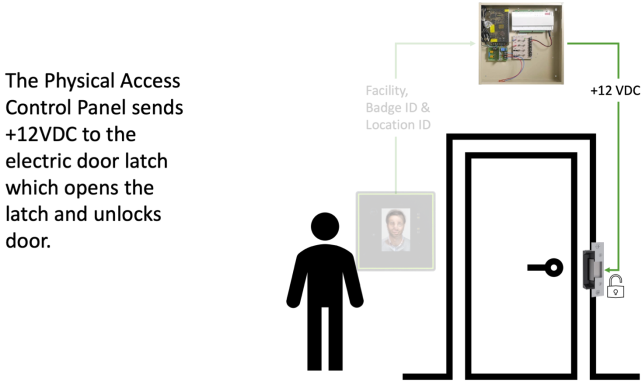
This section outlines the process for typical single factor face authentication with SAFR SCAN. The process begins with faces being enrolled from the physical access control system and loaded into SAFR SCAN. This is a one-way sync that is facilitated through SAFR Software running on a PC. Once faces are loaded, the system is functional and the sequence below demonstrates how SAFR performs authentication, sends the person credentials to the access control panel which in turn unlocks the door as long as the person is authorized.







1.2 SAFR SCAN Capabilities
1.2.1 Key Advantages
-
Integrates easily with standard Access Control Systems
- Import faces from access control systems without re-enrollment.
-
Connects to Panel via Wiegand and OSDP / Relay to open locks directly.
- Wiegand and OSDP Inputs and Outputs to transmit credentials.
- TTL Input/Output for controlling LEDs.
- Relay for closing/opening circuit on locks or other hardware.
-
Enroll from an image file or webcam
- No need to enroll 3D face images on the device.
- Unique approach to liveness verification using a combination of 2D (texture and context) and 3D (face structure) technologies.
-
Low Bias / High Accuracy matching
- Least variation across race and gender (bias) in NIST FRVT Part 3 Demographics.
- 99.87% LFW (labeled faces in the wild) matching accuracy / 99.85% for masked faces.
-
Fastest and smallest model in NIST FRVT
- 20ms detection time / 200ms match time
-
Works indoors and outdoors in extreme lighting and environmental conditions.
- Strong backlight – Applies face prioritized exposure. SAFR SCAN's direct control over camera and fast detection times allow it to adjust exposure in real time to get proper exposure on face.
-
Low / Zero light – SAFR SCAN use a combination of strategies to handle low light.
- Applies IR illuminator to perform face recognition in low light for face detection.
- Gradually fades in white light on front panel to illuminate the face for matching.
1.2.2 Noteworthy Features
-
Self-contained
- Unlocks door even if network offline.
- Stores identities and performs face matching on-board.
- Embedded algorithm for fast and accurate operation.
-
Mobile credentials via SAFR Key App
- Allows 2 factor authentication: Face + phone (or card)
- Phone stays in pocket / transparent to end user
-
RTSP Output for integration to VMS
- SAFR SCAN camera can be added to VMS and other DVR systems to augment the existing video surveillance system.
-
Works with masks
- Enroll once (without mask). Match with and without mask.
-
Multifactor Authentication
- Authenticate via Face, Card, Mobile, PIN* or 2-way Audio*
-
Dual redundant power supply
- Power via PoE, AUX 12-24 VDC power, or both
* Feature to be released with firmware update
1.2.3 Other Features
- Tamper detection (motion and shock)
- High throughput (30 people/min)
- 50,000 user capacity on device
-
10,000 event capacity on device
- Events are cached in case of loss of network
- When network restored, all events sent to server which is limited only by disk capacity
- Unlimited user capacity on server for both people and events
- Scalable from 1 door to 1000+ doors
- Option for On-Premises or Cloud hosted solution
- Desktop and Mobile apps for easy enrollment and management
- RESTful APIs for integration to external identity management and incident management systems
1.2.4 Flexible Enrollment options
- Synchronize faces and credentials from access control system
- Enroll face or card on device
- Import from image file
- Bulk import image files
- Mobile App enrollment
- Enrollment Kiosk
- Remote enrollment
- RESTful APIs
1.2.5 Advanced Analytics
- Persons of interest/Watchlist monitoring and alerting
- Tailgating detection and alerting
- People counting and reporting*
- Occupancy counting and alerting*
- Audio intercom*
* Feature to be released with firmware update
1.2.6 Security
-
SAFR SCAN is designed, built, maintained, and regularly updated with security in mind.
- End-to-end data encryption.
- Cyber security protocols
-
Customer data, and access to it, is isolated at the customer premises.
- Cloud hosted options exist, but on-premises solution puts customer in total control of their data.
-
Data Security (Data-at-Rest Security)
- Data is encrypted at rest (on disk) with AES-256 and RSA-2048 ciphers.
- No biometric data leaves the device for processing.
-
Optional configuration allows for zero PII to be stored or used at the edge.
- No name or pictures are sent to SAFR SCAN.
- Only biometric signature and credential number are stored at edge.
-
Network Security (Data-in-Transit Security)
- Data is encrypted in transit (network) using TLS (https) to encrypt all transactions.
- Any request to access data must be authenticated using role-based credentials.
- All access is logged and available for auditing.
-
Device Security (Data-in-process Security)
- Device has a secure boot that prevents rogue OS loading / tampering.
- SAFR SCAN prevents access to the device firmware by isolating its operation, protecting it from inspection and ensuring that the boot process is secure.
• Fast and accurate face recognition - SAFR SCAN uses SAFR’s exceptionally accurate AI-powered facial recognition algorithm.
• Up to 50,000 enrollment capacity - Up to 50,000 people can be enrolled in SAFR SCAN’S Person Database.
• Individual people enrollment - People can be added to SAFR SCAN’s Person Database individually. (i.e. one by one)
• Mass enrollment - Large numbers of people can be enrolled at once by submitting their photos to a full SAFR system and then syncing your SAFR SCAN’s Person Database with the SAFR system.
• Single- or dual-factor authentication - See the Authentication section below.
• Mask detection and recognition - SAFR SCAN is able to detect when people are wearing masks, and it can continue identifying faces even when they’re wearing masks.
• Wiegand and OSDP support - SAFR SCAN supports both Wiegand and OSDP connections for both access control devices (e.g. relays, physical access panels (PACs), etc.) and authentication devices (e.g. badge readers, fingerprint readers, etc.).
• Indoor/outdoor - SAFR SCAN is able to successfully operate in both indoors and outdoors lighting and environmental conditions.
• Anti-spoofing - Structured lighting can be used to test camera image liveness.
1.3 Authentication
SAFR SCAN's primary function is to authenticate a person attempting to gain access to one a resource. SAFR SCAN offers the following types of authentications.
1.3.1 Single Factor Authentication - Face Authentication
SAFR SCAN can grant access using people’s faces as their credentials. The faces must pass a liveness check which SAFR SCAN automatically executes before access is granted. Credentials are sent out either via Wiegand, OSDP, or an electronic locking mechanism triggered via a relay connection.
1.3.2 Single Factor Authentication - Various Authentication Types
SAFR SCAN can also be configured to grant access when any one of a number of authentication types is presented. The most common two types of authentications that are used are face authentication and badge. But SAFR SCAN can use the Wiegand or OSDP inputs to integrate with and accept other authentication types such as fingerprint or iris. If one of the configured authentication types are presented, credentials are sent out either via Wiegand, OSDP, or an electronic locking mechanism triggered via a relay connection.
This method is useful for providing users the choice of authentication method.
1.3.3 Two Factor Authentication
Finally, SAFR SCAN can be configured to grant access only if a person presents two forms of authentication: face and one other type. SAFR SCAN supports Badge or SAFR Mobile Credentials internally, but you can use the Wiegand or OSDP inputs to enable other authentication types. The order the authentication types are presented is unimportant. When one of the authentication types is presented, SAFR waits a configurable time for the second authentication type to be presented. If both authentication types are presented within the configured time frame, credentials are sent out either via Wiegand, OSDP, or an electronic locking mechanism triggered via a relay connection.
1.4 SAFR Applications
This section provides an overview of the SAFR Applications for managing SAFR SCAN.
1.4.1 SAFR SCAN Web Console
The SAFR SCAN Web Console is a web-based interface for administering a single reader. On first boot, SAFR SCAN Web Console is used to setup system login. In provides full administration capabilities for SAFR SCAN when not connected to SAFR Server and when connected to SAFR Server is used for a subset of system administration capabilities.
- Live View - Provides live monitoring of a single SAFR SCAN displaying video preview and real time events.
- People - Add, update, or delete persons and credentials.
- Operation - Device configuration for operation settings
- System - Device configuration for system settings.
1.4.2 SAFR Server
A background service that runs on Windows or Linux to manage multiple SAFR SCAN on the local network. Support VM or bare metal operation and performs the following functions:
- Device Configuration - Configure settings of one or more devices from a single location.
- Identity Synchronization - Performs a 1-way sync from PACS or external user directory sources.
- Person Synchronization - Synchronize person records between SAFR Server and all connected readers.
- Event Aggregation - Aggregate store events from all readers into a single location to enable reporting and act as a proxy for 3rd party applications getting events either real time or on demand thru REST APIs.
- Reports - SAFR Server uses its event database to generate a variety of reports.
- SMS/Email Alert Notifications - Generate SMS or email for events matching specific parameters.
1.4.3 SAFR Desktop
A modern Windows user interface with a rich feature set that offers a number of tools to manage and monitor SAFR SCAN and the person database. Includes powerful tools to manage all aspects of access control.
- Device management - Centralized configuration of all readers – one at a time or as a group.
- System Configuration - Configure system level settings like connecting to external.
- Person management - View, Add, update or delete person records.
- Event Viewer - View, filter or export events data.
- Operator Console - Unified view of activity in a single window containing aggregated view of events, alerts, and video feeds.
- Forensic search - Use image file or person characteristics to search event history or person database.
1.4.4 SAFR Mobile App
Mobile Apps for enrollment and monitoring on the go. The SAFR Mobile app runs on iOS or Android and performs many of the administration features of SAFR Desktop. The mobile applications can also be configured as a registration kiosk or as a portable recognition tool. Real time alerts thru SMS or Email can be triggered. Alerts can include a link that loads the person record of the match person and provides a view of recent events for that person.
1.4.5 SAFR Server Web Console
Web Browser for quick access w/o desktop pre-installed. The web-based interface that provides most of the same features as SAFR Desktop to enable portable management of the SAFR Server. Includes Device Management, System Configuration, People Management and Event Viewer.
1.4.6 SAFR Key
Mobile application facilitates the SAFR Mobile Credentials feature. See Mobile Credentials for more information.
1.4.7 SAFR Actions
SAFR Actions is used to create and manage actions based on event triggers. Actions can be written in Python and can be deployed for wide range of IFTTT scenarios. Actions can unlock a door, turn on a light, send an alert, record data for reporting, or any number of actions depending on the use case.
1.5 SAFR License Accounts
SAFR Applications require a license to run. This section describes SAFR Licensing and how it applies to SAFR SCAN.
1.5.1 License Types
SAFR offers two types of products with overlapping capabilities and use cases.
- SAFR for Security – Use facial detection and recognition to for watchlist alerts.
- SAFR for Access Control – Use facial detection and matching for physical access control.
SAFR for Security can be further divided into two license type depending on the type of camera used.
- SAFR Camera – SAFR Camera performs both detection and recognition on the device. A SAFR Software On-Premises license is included with each SAFR device licensed as long customer is hosting the on-premises solution. A subscription license can be purchased for SAFR Cloud. SAFR Software allows for camera management, watchlist management, event aggregation and reporting.
- 3rd party cameras – SAFR Software performing both detection and recognition on a Windows or Linux server. SAFR Software is licensed on a per-camera basis as either subscription or perpetual licenses. Options exist to license SAFR Software for 3rd party cameras as either on-premises (subscription or perpetual) or cloud hosted subscription.
SAFR for Access Control
- SAFR SCAN also performs both detection and face matching on the device. A SAFR Software On-Premises license is included with each device. A cloud hosted subscription can be optionally purchased.
How to get a license
A SAFR Software license is associated with a SAFR Account. Visit http://safr.real.com/portal to create a SAFR Account and request a license. Once approved, the SAFR Software license is activated by signing into the SAFR Software with your SAFR Account. The license will be automatically downloaded from SAFR Cloud or you can perform the offline licensing process to apply your SAFR License to your On-Premises server.
1.5.1.1 SAFR Cloud vs. SAFR On-Premises
SAFR On-Premises Software runs entirely on the customer site. The software connects to either 3rd party cameras, SAFR Camera or SAFR SCAN and provides a mechanism to manage configuration across all devices, manage the identity database, view and filter events, generate reports, and general administration.
SAFR Cloud has the same capabilities, but the core services are hosted by SAFR. A SAFR Cloud customer may choose to run SAFR Desktop or use SAFR Web Console to manage and interact with the services.
2 Hardware
This section describes the SAFR SCAN hardware components and their function.
2.1 Front Panel
|
|
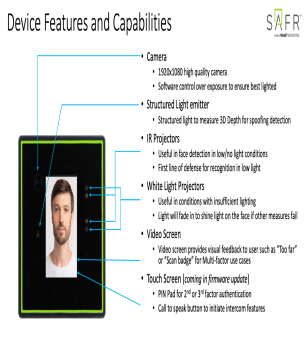
Camera - 1920x1080 high quality camera. Software control over exposure to ensure best lighted. Structured Light emitter - Structured light to measure 3D Depth for spoofing detection. IR Projectors - Useful in face detection in low/no light conditions. First line of defense for recognition in low light White Light Projectors - Useful in conditions with insufficient lighting. Light will fade in to shine light on the face if other measures fail. Video Screen - Video screen provides visual feedback to user such as “Too far” or “Scan badge” for multi-factor use cases Touch Screen* - PIN Pad for 2nd or 3rd factor authentication. Call to speak button to initiate intercom* features |
|
|
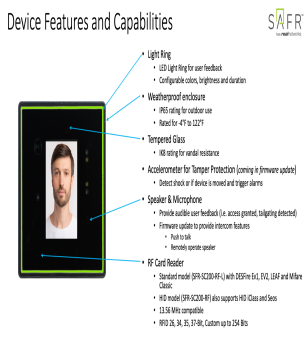
Light Ring - LED Light Ring for user feedback. Configurable colors, brightness and duration. Weatherproof enclosure - IP65 rating for outdoor use. Rated for -4°F to 122°F. Tempered Glass - IK8 rating for vandal resistance. Speaker - Provide audible user feedback (i.e., access granted, tailgating detected). Microphone*- Push to talk, two-way audio. RF Card Reader - Standard model (SFR-SC200-RF-L) with DESFire Ev1, EV2, LEAF and Mifare Classic. HID model (SFR-SC200-RF) also supports HID iClass and Seos. 13.56 MHz compatible. RFID 26, 34, 35, 37-Bit, Custom up to 254 Bits Accelerometer for Tamper Protection* - Detect shock or if device is moved and trigger alarms. |
* Enabled in future firmware release
2.2 Back Panel
Figure below shows the connections and switches on the rear of the SAFR SCAN reader.
|
|
|
2.2.1 Terminal Blocks
The T1 and T2 terminal blocks are shown without the terminal blocks to reveal the OSDP Termination Switch which is located under the T1 terminal block. The terminal blocks allow wires to remain connected while SAFR SCAN is removed from the wall. This can be useful when staging your devices on a bench for installation.
Be careful not to switch the terminal blocks when replacing. This will not harm the SAFR SCAN device but can result in confusion as the device will not function properly.
To remove the terminal blocks, pry gently upwards with your fingers or needle nose plyers. The terminal blocks require a 2mm flathead screwdriver to loosen or tighten the screws that hold in the wires.
2.2.2 OSDP Termination Switch
When installing SAFR SCAN to a panel with OSDP, the termination switch should be set to enabled (down position) for the last reader on the bus. By default, the switch is enabled (down position) and suitable for single reader connected to the panel. When installing multiple readers in daisy chain configuration, the termination switch should be disabled (up) for all readers except the reader furthest from the panel.
2.2.3 Reset Button
Reset button is located just inside the upper left mounting opening. It is a round button just to the right of the mounting hole. Press this button for 10 seconds while device is connected to power to reset to factory defaults. Reset is complete when LED next to Aux Port change from flashing orange to solid red.
This will remove all data (identities, credentials, account and networking settings) and restore device to original factory defaults. The firmware version is maintained.
2.2.4 Back Panel Inputs and Outputs
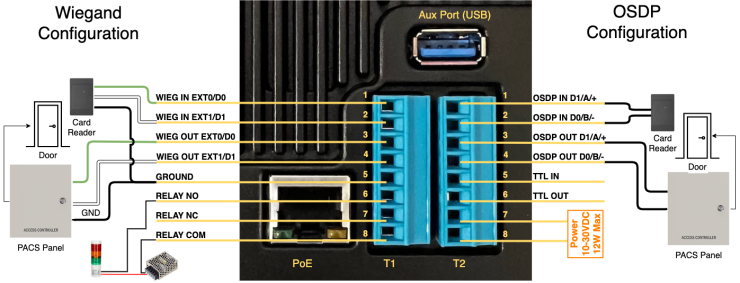
Figure below shows the T1 and T2 terminal blocks on the rear of the SAFR SCAN reader. The T1 terminal block includes Wiegand in and Wiegand out terminals as well as a Normal Open and Normally Closed relay. The T2 terminal block (Right) includes OSDP in and OSDP out terminals as well as TTL connections and auxiliary power.
The diagram depicts either a Wiegand configuration (left) or an OSDP configuration (right) with SAFR SCAN taking input from an external card reader and providing output to the PAC Panel. Note that some SAFR SCAN models include a built-in RF card reader.
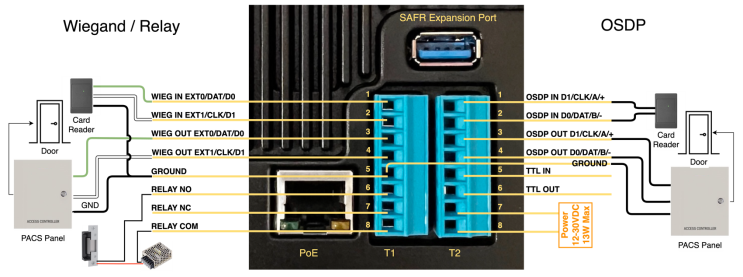
- OSDP/Wiegand/TTL: 22 AWG shielded twisted pair wire, 4000 feet (1200 m) maximum.
- Relay: NC/NO 120 VAC / 24 VDC max, 1 Amp max. 22 AWG wire.
- Aux Power:12 VDC @1 Amp / 24 VDC @ 0.5 Amp (12W). Polarity reversible. 22 AWG wire.
- PoE: PoE 802.3af, Class 3; 14 watts.
Tools Needed
- 2mm flathead screwdriver (for terminal block screws).
- 2mm hex wrench (for SAFR SCAN device two Mounting Plate screws).
2.2.4.1 Aux Port (USB)
The auxiliary USB port is used to connect SAFR SCAN to a breakout box that can be located remotely from the device thru a secure cable. This allows unsecured connections such as Wiegand or TTL to be placed on the secure side of the door.
The breakout box will be available June 2023 and includes all connections on the rear of the SAFR SCAN panel as well as USB Ports for additional device storage. The breakout box is connected with a USB-A cable.
2.2.4.2 Ethernet
SAFR SCAN ethernet port provides two primary functions.
- Remote management of the reader thru IP local area network
- Device power (optional) thru PoE (see Power below for more details).
2.2.4.3 Terminal Block Pins
Terminal block pins are used to interface into external hardware. The terminal block can be removed from SAFR SCAN to easily attach external wiring. Each terminal block has 8 pins. A 2 mm flathead screwdriver can be used to secure wires to the terminal block.
Table below describes the function of the different inputs and outputs.
|
Wiegand In |
SAFR SCAN can connect to Wiegand sources such as an external reader to allow multi-factor authentication. These ports are also used for the SAFR Time and Attendance Feature. ⚠️ You must enable Wiegand In in Software Settings to activate these ports. |
|
Wiegand Out |
SAFR SCAN can connect to the access control panel using Wiegand protocol. ⚠️ You must enable Wiegand Out in Software Settings to activate these ports. |
|
OSDP In |
SAFR SCAN can connect to OSDP sources such as an external reader to allow multi-factor authentication. ⚠️ You must enable OSDP In in Software Settings to activate these ports. |
|
OSDP Out |
SAFR SCAN can connect to the access control panel using OSDP protocol. ⚠️ You must enable OSDP Out in Software Settings to activate these ports. |
|
Relay |
Two relays are provided. One Normal Open relay that closes the circuit upon authentication and one Normally Closed relay that opens the circuit upon authentication. Both NO and NC relay share a common ground connection. NO/NC relay do not provide power. Power must be provided by external source. |
|
TTL |
These pins will offer ability to receive or send signals in future firmware updates. |
2.2.4.4 Power
SAFR SCAN is powered in one of two ways
- PoE cable - PoE 802.3af, Class 3; 14 watts (Device draws 12 watts max).
- Auxiliary Power - Power via 12 volts DC source to pin 7 and 8 on terminal block T2. Polarity is reversible - ground can go on either pin.
Power can be delivered either via PoE ethernet or DC power to pins 7 and 8 on terminal block T2. If powered ethernet is not available, use Aux Power on pins 7 and 8 to power. Ethernet is still recommended for remote management.
2.2.4.4.1 Power redundancy
SAFR scan supports redundant power supply. If power is delivered for both PoE and Aux power, SAFR SCAN will draw 50% of its power from each source. If power to either of the sources fails, SAFR SCAN will increase power draw to the remaining source with no interruption in service.
2.3 Installation
For information on installation of SAFR SCAN standard (SC100, SC200-RF) or mullion (SC50) readers see the respective guide for each product.
3 SAFR Accounts
SAFR Software requires a SAFR License account. See SAFR SCAN
This section describes how to create your SAFR Reseller Software Download Account. SAFR Reseller Software Download Accounts give the reseller access to demo software free of charge and ability to create Customer Software Accounts. Customer Software Accounts allow your end users to download and activate the software.
3.1 Create Reseller Software Download Account
If you already have a Reseller Software Download Account, skip ahead to next section.
If your organization does not already have one, take following actions to request a new Reseller Account:
- Go to http://safr.com/resellers
- Click on Sign up to request a new Reseller Account
-
Complete the form to request an account.
- Reseller name, website, and country for your company
- Enter your company email address
- Shortly after you will receive an email to confirm your email address. Click the link to verify your email address.
- Your request is then sent to our sales operations team for processing. You can expect a response typically within 4 business hours. Feel free to contact us at support@safr.com if you have any questions.
- Once approved, you will receive an email with instructions on how to activate your account.
3.2 Create a Customer Software Account for each deployment
Use SAFR Cloud or SAFR On-Premises Server to manage multiple devices centrally and synchronize people from your access control software.
If using SAFR Cloud, SAFR SCAN can connect to a single SAFR Cloud Customer Account from multiple independent local area networks (LANs) if network firewalls allow for outbound HTTPS.
v
If using SAFR Server, one SAFR On-Premises Customer Account is required for each LAN where SAFR will be installed, assuming routing is not available between each LAN. A single customer of SAFR SCAN may have multiple accounts if needed.
To create a SAFR Cloud or SAFR On-Premises Server perform following steps:
- Go to http://safr.com/resellers
- Sign in with your SAFR Reseller Account credentials.
- Choose “Request customer account” in account menu in upper right.
-
Choose the SAFR SCAN license type.
License defaults to On-Premises. If you need a SAFR Cloud hosted license, contact support@safr.com. -
Complete the form to request a license.
- Enterprise name, website, and country should be the organization where SAFR SCAN is deployed.
- Email should be the user that will manage the license.
- Obtain MAC Address from sticker on SAFR SCAN device or the box.
- An email will be sent to the email address indicated above to activate the license and set a password.
3.3 Connect SAFR SCAN SAFR On-Premises Server
Use SAFR On-Premises Server to manage multiple devices centrally and synchronize people from your access control software.
Install SAFR Platform application
- Go to http://safr.com/resellers.
- Click on Product Downloads
- Sign in with your SAFR Account
- Select the desired operation system (SAFR SCAN supports Windows or Linux versions)
- Download and install the SAFR Platform CUDA 10 Edition.
- When installation is complete, sign into the Desktop Client using your SAFR Account credentials.
NOTE: You can install the software on only one machine. Once installed the software will bind to that machine. If you need to migrate to a new machine, contact support@safr.com to reset the hardware binding on your license.
Connect SAFR SCAN to SAFR On-Premises Server
- Open the SAFR SCAN Web Console as described in First Run above
- Navigate to System > SAFR Server.
- Choose “SAFR Server”.
- Enter the IP Address of SAFR Server and your SAFR Account credentials.
3.4 Connect SAFR SCAN to SAFR Cloud
Use SAFR Cloud to manage multiple devices centrally. SAFR Cloud does not support connection to an On-Premises access control software. Used SAFR On-Premises if this is required.
Connect SAFR SCAN to SAFR Cloud
- Open the SAFR SCAN Web Console as described in First Run above
- Navigate to System > SAFR Server.
- Choose “SAFR Server”.
- Enter the IP Address of SAFR Server and your SAFR Account credentials.
Sign into SAFR Cloud
- Go to http://safr.com > Customer Portal > SAFR Cloud Web Console
- Sign in with your SAFR Account
See SAFR SCAN Documentation at go to http://safr.com > Customer Portal > Documentation for information about SAFR Desktop and SAFR Mobile clients.
4 Installation Guides
Following sections describe hardware and software setup for following applications.
- Single Factor Face Authentication - Install and configure SAFR SCAN to use single factor face authentication to grant access via an electronically locked door.
- Two Factor Authentication - Install and configure SAFR SCAN to use two factor authentication to grant access via an electronically locked door.
- Single Factor Authentication with Relay - Install and configure SAFR SCAN to use single factor face authentication to grant access via an electronically locked door that’s connected by a relay.
- Two Factor Authentication with Relay - Install and configure SAFR SCAN to use two factor authentication to grant access via an electronically locked door. In addition, a light connected to a relay turns on when someone is granted access.
4.1 Single Factor Face Authentication
This page describes how to install and configure SAFR SCAN to use single factor face authentication to grant access via an electronically locked door.
4.1.1 Hardware Setup
For all connections, do the following:
- Pull the appropriate 8-pin connector (i.e. T2 or T1) from its slot to expose the screws that secure the wires.
- Insert the connecting wires into the specified pins.
- Tighten the screws to secure the wires in place.
|
Wiegand Connections |
OSDP Connections |
|
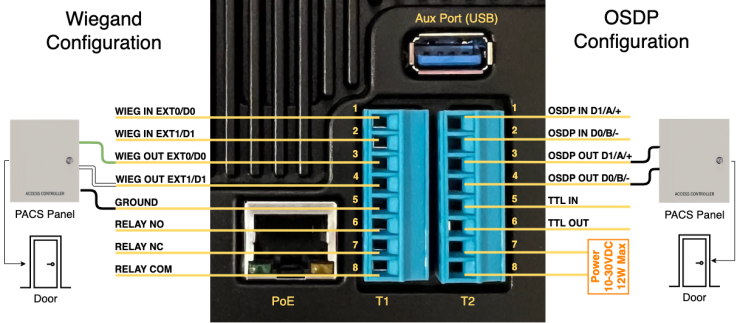
• Connect Wiegand Out Ext1 on SAFR SCAN to the corresponding input on the PAC Panel. • Connect Wiegand Out Ext0 on SAFR SCAN to the corresponding input on the PAC Panel. • Connect Ground on SAFR SCAN to the corresponding input on the PAC Panel. |
• Connect OSDP Out B/- on SAFR SCAN to the corresponding input on the PAC Panel. • Connect OSDP Out A/+ on SAFR SCAN to the corresponding input on the PAC Panel. |
4.1.2 Software Setup
To configure SAFR SCAN’s software, do the following:
- Open a web browser on a PC or Mac and go to the SAFR SCAN Console.
- Go to the Operation tab.
- On the Access Control side tab, set the Access Mode setting to Face Recognition.
- Go to the System tab.
- Go to either the Wiegand or OSDP side tab, depending on your connection type, and set the Connection to Control Panel field to Enabled.
4.1.3 Behavior
When a known face with access credentials is presented to SAFR SCAN, the access card format and IDs are retrieved from the matched person record. Those credentials are then sent over the Out ports to the PAC panel, which looks up the user credentials and grants access if permitted.
4.2 Single Factor Face Authentication
This page describes how to install and configure SAFR SCAN to use single factor face authentication to grant access via an electronically locked door.
4.2.1 Hardware Setup
For all connections, do the following:
- Pull the appropriate 8-pin connector (i.e. T2 or T1) from its slot to expose the screws that secure the wires.
- Insert the connecting wires into the specified pins.
- Tighten the screws to secure the wires in place.
|
Wiegand Connections |
OSDP Connections |
|
|

4.2.2 Software Setup
To configure SAFR SCAN’s software, do the following:
- Open a web browser on a PC or Mac and go to the SAFR SCAN Console.
-
Go to the Operation tab.
- On the Access Control side tab, set the Access Mode setting to Face Recognition.
-
Go to the System tab.
- Go to either the Wiegand or OSDP side tab, depending on your connection type, and set the Connection to Control Panel field to Enabled.
4.2.3 Behavior
When a known face with access credentials is presented to SAFR SCAN, the access card format and IDs are retrieved from the matched person record. Those credentials are then sent over the Out ports to the PAC panel, which looks up the user credentials and grants access if permitted.
4.3 Two Factor Authentication
This page describes how to install and configure SAFR SCAN to use two factor authentication to grant access via an electronically locked door.
4.3.1 Hardware Setup
For all connections, do the following:
- Pull the appropriate 8-pin connector (i.e. T2 or T1) from its slot to expose the screws that secure the wires.
- Insert the connecting wires into the specified pins.
- Tighten the screws to secure the wires in place.
|
Wiegand Connections |
OSDP Connections |
|
|
4.3.2 Software Setup
To configure SAFR SCAN’s software, do the following:
- Open a web browser on a PC or Mac and go to the SAFR SCAN Console.
-
Go to the Operation tab.
- On the Access Control side tab and set the Access Mode setting to Face Recognition AND Access Card.
-
Go to the System tab.
- Go to either the Wiegand or OSDP side tab, depending on which you’re using, and set the Connection to Control Panel field to Enabled.
- Go to either the Wiegand or OSDP side tab, depending on which you’re using, and set the Connection to Card Reader field to Enabled.
4.3.3 Behavior
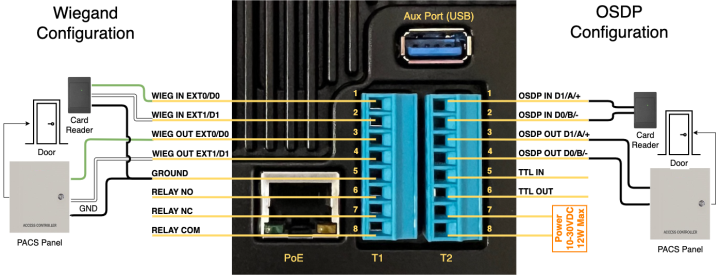
When a known face with access credentials is presented to SAFR SCAN, the access card format and IDs are retrieved from the matched person record. SAFR SCAN then awaits card reader input from the In ports with the same credentials. If found, those credentials are then sent over the Out ports to the PAC panel, which looks up the user credentials and grants access if permitted.
SAFR SCAN also allows the reverse order for authentication. (i.e. first badge and then face)
4.4 Single Factor Authentication with Relay
This page describes how to install and configure SAFR SCAN to use single factor face authentication to grant access via an electronically locked door connected by a relay.
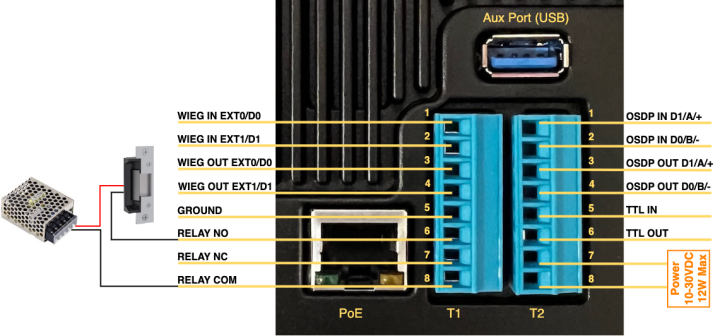
4.4.1 Hardware Setup
To configure the hardware, do the following:
- Pull the T1 8-pin connector from its slot to expose the screws that secure the wires.
- Connect Relay COM on SAFR SCAN to the red wire on the relay.
- Connect Relay NO on SAFR SCAN to the red DC wire on the power supply.
- Connect the black DC wire on the power supply to the black wire on the relay.
- Tighten the screws to secure the wires in place.
4.4.2 Software Setup
To configure SAFR SCAN’s software, do the following:
- Open a web browser on a PC or Mac and go to the SAFR SCAN Console.
-
Go to the Operation tab.
- On the Access Control side tab and set the Access Mode setting to Face Recognition.
-
Go to the System tab.
- Go to the Door strike relay side tab and set the Electric door strike relay field to Enabled.
4.4.3 Behavior
When a known face with access credentials is presented to SAFR SCAN, the Normally Open (NO) relay port is closed. This action closes the circuit connecting the power supply positive terminal to the positive terminal on the door lock mechanism which in turn releases the lock mechanism allowing the door to be opened.
4.5 Two Factor Authentication with Relay
This page describes how to install and configure SAFR SCAN to use two factor authentication to grant access via an electronically locked door. In addition, a light connected to a relay turns on when someone is granted access.
4.5.1 Hardware Setup
For all connections, do the following:
- Pull the appropriate 8-pin connector (i.e. T2 or T1) from its slot to expose the screws that secure the wires.
- Insert the connecting wires into the specified pins.
- Tighten the screws to secure the wires in place.
|
Wiegand Connections |
OSDP Connections |
|
|
4.5.2 Software Setup
To configure SAFR SCAN’s software, do the following:
- Open a web browser on a PC or Mac and go to the SAFR SCAN Console.
-
Go to the Operation tab.
- On the Access Control side tab and set the Access Mode setting to Face Recognition AND Access Card.
-
Go to the System tab.
-
Go to either the Wiegand or OSDP side tab
- Depending on which you’re using, and set the Connection to Control Panel field to Enabled.
- Depending on which you’re using, and set the Connection to Card Reader field to Enabled.
- Go to the Door strike relay side tab and set the Electric door strike relay field to Enabled.
-
Go to either the Wiegand or OSDP side tab
4.5.3 Behavior
When a known face with access credentials is presented to SAFR SCAN, the access card format and IDs are retrieved from the matched person record. SAFR SCAN then awaits card reader input from the In ports with the same credentials. If found, two things occur:
- Those credentials are then sent over the Out ports to the PAC panel, which looks up the user credentials and grants access if permitted.
- The Normally Open (NO) relay port is closed, causing the light hooked up to the relay to turn on.
SAFR SCAN also allows the reverse order for authentication. (i.e. first badge and then face)
5 SAFR SCAN Web Console
The SAFR SCAN Web Console provides administrators and operators web-based access to SAFR SCAN. This section describes the SAFR SCAN Web Console interface and configuration properties. See the SAFR SCAN Quickstart Guide for information on how to use the SAFR SCAN Web Console.
The first time you open the Console, it will automatically open to the Live tab shown below.
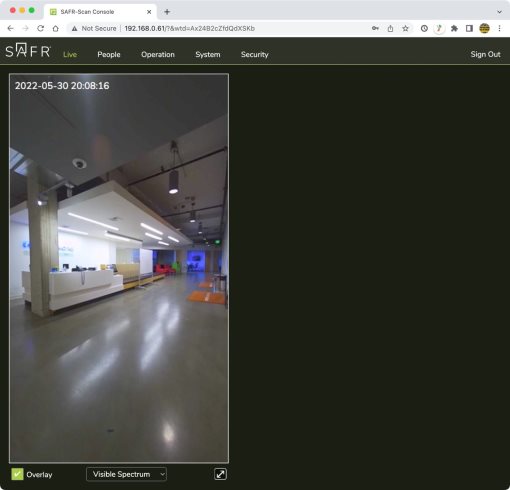
Along the top of the page you’ll see the following 5 tabs:
- Live Tab
- People Tab
- Operation Tab
- System Tab
- Security Tab
5.1 Live Tab
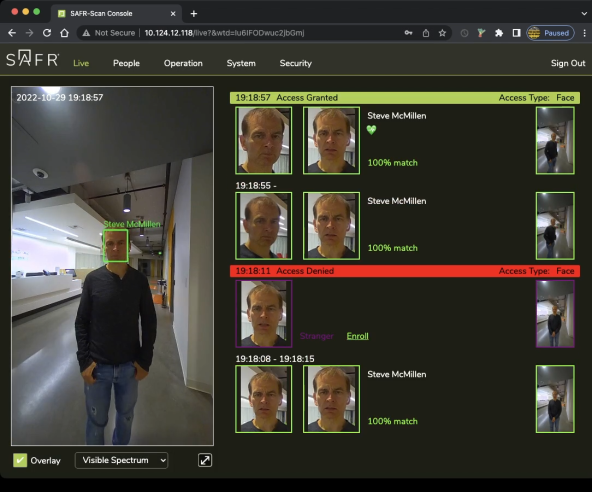
Live tab displays the camera view of the SAFR SCAN device on the left and events on the right.
5.1.1 Live Video Preview
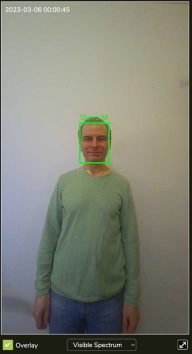
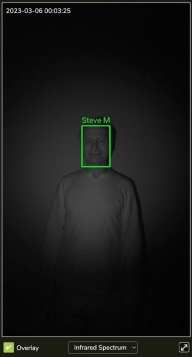
Displays Video from the SAFR SCAN camera with overlay information adding boxes around the person's face and the person name. Each face above the detection thresholds in the view will have its own overlay. The overlay colors will vary depending on the type of face
- Grey (Unrecognizable) - Face is of insufficient quality to attempt reliable face matching.
- Purple (Stranger) - Face was not found in the local person database.
- Green (Known) - Face was found in local person database.
- Yellow (Concern)- Face of person record with idClass=Concern was found.
- Red (Threat) - Face of person record with idClass=Threat was found.
Device Feedback
SAFR SCAN provides feedback to the credential holder letting them know if access was granted or denied.
- Anybody who was granted access appears in green on the right side
- Anybody who was denied access appears in red.
For somebody to be granted access, two conditions must be met:
- The person must be entered in the People Database as described in the Quickstart Guide and People tab documentation.
- The person must pass a liveness check. The green heart below the person’s name indicates that the liveness check was passed.
Feedback is provided to the user using device LED Ring, on-screen text and sound. By default the feedback is presented simply based on the condition above. If Feedback from Panel (via either Wiegand or OSDP) is enabled then SAFR SCAN waits while the Access Control Panel determines if access should be granted or not based on access rules and schedules and displays appropriate feedback to user. Feedback from Panel is described in a separate guide.
5.1.2 Overlays
Overlays may be turned off using the checkbox shown.
5.1.3 Video preview mode
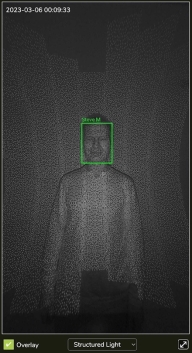
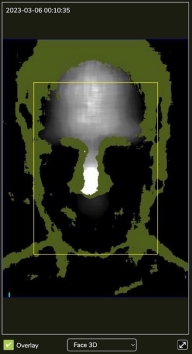
You can select which sensor is displayed using the dropdown. Options are:
|
Visible Spectrum |
Infrared Spectrum |
Structured Light |
Face 3D |
|
|
|
|
|
You can see thousands of dots of light that are emitted in the Structured light view. These are used to determine depth and relative distance of subjects with high accuracy. The Infrared Spectrum image was taken with the lights out.
5.1.4 Events
The section on the right displays events. There are two types of events that are reported in SAFR SCAN Web Console. They are:
|
Access Granted |
|
|
Access Denied |
|
|
Match |
|
|
Tailgating – Known person |
Event shows time, face and scene image as well as enrolled face image and person data. |
|
Tailgating - Stranger |
Event shows time, face and scene image. |
This is a subset of the events reported by SAFR Desktop. See SAFR Desktop chapter in this guide for more information on other event types.
5.1.4.1 Event Persistence
SAFR SCAN does not store events locally on the device. If connected to SAFR Server or SAFR Cloud, all events are sent to the server for monitoring, auditing, and reporting. If the network goes offline, events are saved locally and persisted in volatile RAM until the network is restored, at which time the cached events are transmitted to the server and deleted locally. Up to 30,000 events can be cached locally, the first 2,000 with images and remaining without images.
5.1.4.1.1 Persistent vs. Volatile storage of events
To ensure long lifespan of the onboard flash storage, SAFR does not persist transient data such as events to permanent storage. Offline events Persistence is done in volatile memory. If the device that is offline with cached events loses power before connection to the server is re-established, all cached events will be lost. For this reason, a device that has lost network connection should not be shut down until network is restored and device allowed to upload all cached events.
If Attendance Mode is enabled, events are persisted to disk to ensure that attendance records are not lost should the device lose power. If (and only if) using Attendance Mode, events captured while offline from server will be retained if the device is powered down. Upon restarting the device and restoring connection to SAFR Server, cached events will be uploaded.
5.2 People Page
The People tab allows you to manage and configure your enrolled people. You can also enroll people using saved face images.
5.2.1 Enroll a Person Using a Face Image
Do the following to enroll someone using a saved face image:
-
Click Add. You will see an empty dialog as shown below.
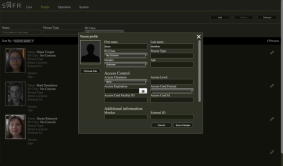
- Click Choose File and select the face image from your local computer, tablet, or phone. The face image should be of good quality with at least 150 pixels from ear to ear.
- Click on the Edit button in the upper right corner of the newly added person's record.
- Enter the following information:
- Enter the person's First name and Last name.
- Set the desired Access Clearance.
- Optionally set Access Card Format if format is expected to vary by person. Set Access Card Format at the reader level if all users are assigned same Access Card Format.
- Set the Access Card Facility ID and Access Card Id fields to the appropriate values for the enrolled person.
- Click Save Changes. The person will be added to the Person Database.
5.2.2 Edit Person Records
To edit the records of people already enrolled in the Person Database, click on the Edit button of their record, as indicated by the arrow below.
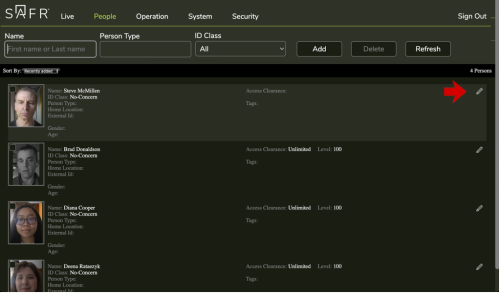
- Name, Person Type and ID Class fields are for filtering.
- Add and Delete buttons allow adding new and deleting persons.
- Refresh will reload. The page does not update automatically like the Live page does.
- Click anywhere except the image or click the pencil icon to edit a record.
- Click anywhere on the face image to select a record (multiple records can be selected at once for deletion).
?If faces do not appear, its likely due to setting to persist synced person face images disabled on server.
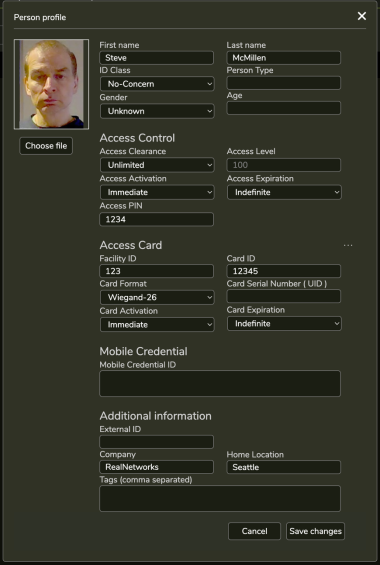
Person has many attributes. Below are just some. The Desktop software has additional properties that cannot be edited on the SAFR Camera Web Console.
5.2.3 Person Field Records
Below are all the configurable fields. Highlighted fields are required for PAC panels connected via Wiegand or OSDP connections. When a relay is used instead, only the First name, Last name, and Access Clearance fields are required.
5.2.3.1 General Information
|
First name |
The person’s first name. |
|
Last name |
The person’s last name. |
|
ID Class |
A classification used to classify threat level (Threat, Concern, or No-Concern). SAFR uses ID Class in reports, event filters and notifications. For unknown persons, SAFR automatically assigns following ID Class values:
|
|
Person Type |
A user-defined grouping to differentiate the people enrolled in your Person Database. (e.g. "student", "teacher", and "staff"). Can be any string (including spaces). Once typed, the value will appear in the dropdown and will auto-complete on future entries. A person type is automatically deleted when the last person with person type is deleted. |
|
Gender |
A fixed value assigned for gender. Values of Male, Female or unknown. If set, SAFR displays this value instead of gender estimated from SAFR gender detection analytic. |
|
Age |
A fixed value assigned for age. If set, SAFR displays this value instead of age estimated from SAFR age detection analytic. |
5.2.3.2 Access Control
|
Access Clearance |
Specifies the level of access this person has. Access Clearances are defined in SAFR Desktop People Window. An Access Clearance includes the following:
|
|
Access Level |
The numerical representation of the person’s access level. This field is set based on the person’s Access Clearance; it isn’t directly editable. |
|
Access Activation |
Date that the person record is first activated. Before this date the person will not be granted access by SAFR (no credential is sent to the panel). Person will appear with an “Inactive” badge in the user interface. Inactive Individuals can be hidden from view via “Hide Expired” in the “…” menu on People Window. |
|
Access Expiration |
Date that the person is no longer activate. After this date the person will not be granted access by SAFR (no credential is sent to the panel). Person will appear with an “Inactive” badge. Inactive individuals can be hidden from view via “Hide Expired” in the “…” menu on People Window. |
|
Access PIN |
4, 6 or 8 digit code (PIN) used with SAFR Keypad as alternate authentication factor. |
5.2.3.3 Access Card
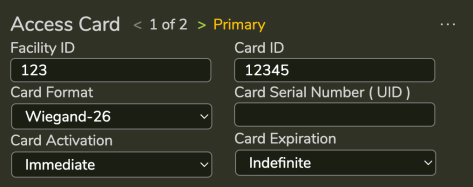
Access Card section stores one or more access cards. If multiple cards, a count will be shown. The first card in the list is the Primary. Support for multiple credentials allows a user to hold one or more credentials. The Primary is the credential that is sent to the panel if not matching a credential as input (i.e. Face only or PIN only access)
|
Facility ID |
Decimal representation of the credential’s facility code encoded into the card. If blank, no facility code is applied. |
|
Card Id |
Decimal representation of the credentials card id encoded into the card. If number exceeds a 32 bit value, it is shown as hexadecimal number. |
|
Card Format |
Layout of the binary data read from an access card or sent to the panel. This information helps SAFR encode the facility id and card id into binary data for purposes of transmitting the card data to the panel. If not set on the person record, the values in the reader will be used. |
|
Card Serial Number (CSN) |
The CSN or UID for the card. All cards have either a 32 bit or 56 bit CSN. SAFR can match on CSN if using the 32-bit or 32-bit mapped card formats. |
|
Card Activation |
Date that the card is first activated. Before this date the card will not be granted access by SAFR (no credential is sent to the panel). |
|
Card Expiration |
Date that the card is no longer activate. After this date the card will not be granted access by SAFR (no credential is sent to the panel). |
5.2.3.4 Mobile Credential
|
Mobile Credential ID |
Stores the mobile credential used to authenticate user with a mobile device. See SAFR Mobile Credentials Guide for more details. |
5.2.3.5 Additional Information
|
External ID |
A field used to reference a unique id in an external system (e.g. the access control system where the record was copied from). This is most often used in integrations to SAFR to allow external system to identify the source of the record. |
|
Company |
A field used to identify a person’s company. Can be any string. |
|
Home Location |
A field used to identify a person’s primary location. Can be any string. |
|
Tags |
Comma separated list of tags. Can be any string. By convention, tags are separated by commas and each element may contain a name=value or simply a value. |
5.3 Operation Settings
5.3.1 Access Control
5.3.1.1 Access Mode
Specifies which kind(s) of user authentication you want to use:
- Face Recognition
- Face Recognition and Access Card
- Face Recognition or Access Card
- Access Card
- Disabled
Note that "Access Card" in the options above refers to any Wiegand-capable or OSDP-capable authentication device that you connect to the SAFR SCAN device.
5.3.1.2 Access Clearances Accepted
Select the access clearances that you want to grant access to your facility. (i.e. When a person with an acceptable access clearance is viewed by the SAFR SCAN device, the door(s) connected to the SAFR SCAN device will unlock.
5.3.1.3 Face match confidence required for access
Specifies how strict you want the SAFR SCAN access control system to be. There are two options:
- High: High face match confidence is required. With this option selected SAFR SCAN has a 99.9996% accuracy rate, which is more than sufficient for the vast maority of use cases.
- Extreme: Extreme face match confidence is required. With this option selected SAFR SCAN has a 99.999996% accuracy rate. Selecting this option can cause SAFR SCAN to be overly strict, resulting in authorized people occasionally not being granted access.
5.3.1.4 Spoofing protection level
Specifies what level of anti-spoofing protection you want to use. SAFR Anti-spoofing is based on combination of proprietary trained AI algorithms (Convolutional Neural Networks) specifically built for SCAN by SAFR that analyze 3D face data, infrared images and RGB visible light spectrum images of the face and the surroundings.
The 3D face data is constructed from the infrared image containing infrared structured light pattern emitted by the device, super-imposed over the face and sampled nearly simultaneous to the RGB image in the visible spectrum.
Algorithms analyze 3D face data for consistency with human 3D face shape while infrared and RGB visible light spectrum images are checked for artifacts indicative of spoofing attempts via masks and other methods.
Options are:
- None (masks allowed)
- Standard (masks allowed)
- High (beta: masks not allowed)
- Extreme (beta: masks and direct sun not allowed)
5.3.1.5 Wait time required to grant access
Number of seconds to wait before granting an authorized person access.
Wait time required to deny access: Number of seconds to wait before denying access to an unauthorized person. We recommend setting this to a non-zero value because sometimes the initial face recognition attempt will fail to match an enrolled person due to a temporary condition. (e.g. a bad angle, momentary bad lighting, etc.) Setting this value to 1 second (or more) gives subsequent face recognition attempts a correct for any temporary bad conditions that may arise.
5.3.1.6 Wait time for second factor
Number of seconds to wait for the second authentication method to validate. If the second authentication method validates after this wait time has been exceeded, then the user will be required to validate the first authentication method again.
5.3.2 Attendance
5.3.3 Tailgating
5.3.3.1 Tailgating detection
Enables tailgating detection.
5.3.3.2 Detection direction
Specifies the direction(s) which are monitored for tailgating. There are two possible options in the drop-down menu.
5.3.3.3 Inbound on entry only
Tailgating is only detected for people entering the facility (i.e., approaching the camera).
Inbound on entry and exit: Tailgating is detected for people entering or exiting the facility. Note that this option only works if the Door open input signal field below is set to either Door open
on Low or Door open on High.
5.3.3.4 Minimum enforced tailgating time
The minimum amount of time where tailgating is enforced after an authorized person is granted access.
Maximum tailgating distance: The maximum distance after an authorized person where a subsequent person is considered a tailgater.
5.3.3.5 Door open input signal
Indicates if the door is open.
Disabled: The door open signal is disabled.
Door open on Low: By default, the door open signal will indicate that the door is closed; a charge must be sent in order to indicate that the door is open.
Door open on High
By default, the door open signal will indicate that the door is open; a charge must be sent in order to indicate that the door is closed.
5.3.3.6 Signal to Control Panel:
When enabled, a tailgating event is sent to the connected control panel when tailgating is detected. In addition, a popup dialog will appear allowing you to set the facility ID and/or card ID that you want to be included with the tailgating event. When enabled, credentials are provided as:
- Tailgating Signal Card Facility ID - The facility ID to include with the tailgating event, if any.
- Tailgating Signal Card ID - The card ID to include with the tailgating event, if any.
When enabled, Edit Signal Card IDs button allows you to edit the Tailgating Signal Card Facility ID and Tailgating Signal Card ID values above.
5.3.4 Monitoring
Monitoring mode
Specifies how SAFR Camera processes its camera view video feed. See the Operator Modes documentation in the SAFR Software Administration Guide for full descriptions of the available Operator Modes.
Below is a summary of the monitoring modes:
• All Events Monitoring (default) – Report all events including unrecognizable faces. Unrecognizable events are not reported until person is in view for at least 1.5 seconds (configurable)
• Enrolled Monitoring – Only record events for known recognized persons
• Enrolled and Stranger Monitoring – Record events for known recognized persons and strangers. Strangers are defined as a face that was of sufficient quality to attempt to recognize, but no match was found.
• Threat/Concern and Stranger Monitoring – Record events for strangers and known people marked as Threat or Concern.
• Learn and Monitor – Auto-enroll faces as they appear in front of the camera. This creates a new identify for every face as long as the quality thresholds for learning are met. This mode is most useful for various reports that learn faces such as Traversal Reports or Queue Reports.
- Note: If you want to enroll specific faces from camera, use “Enroll” option from the Events view.
Additional analytics
Enables additional analytics; age, gender and sentiment analysis. These analytics are estimated from the face image appearing in the camera view. Their accuracy will depend upon the source image quality. No biometric signature is needed to compute.
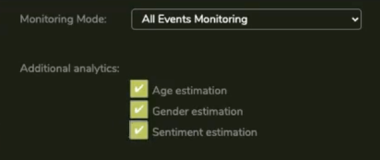
Data is reported in user interface as shown below and persisted with event so it is available in various reports or with exported event data.

Sentiment and Smile are reported as follows:
- During event (while face is in view): Display current sentiment and show smile indicator if smiling.
- After event (face left the view): Display average sentiment and % of time smile was detected.
5.3.5 Tailgating
Settings to enable recording of video to local Micro SD card and optionally to an AWS account. See Digital Video Recording (DVR) Settings section below for information on configuring DVR.
5.3.6 Camera
Screenshot below shows Camera Settings available from Operation > Camera.
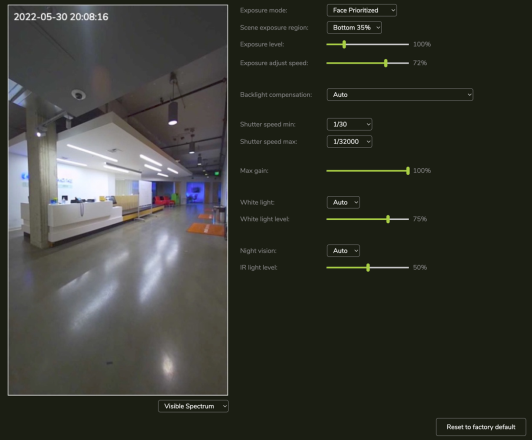
5.3.6.1 EXPOSURE MODE
Options of Face Prioritized and Scene Prioritized.
|
Face Prioritized |
Camera exposure is optimized for any faces in view of the camera. When set to Face Prioritized, camera will adjust exposure to optimize for the largest face in view of the camera. This results in a dynamic exposure. This is the preferred mode for facial recognition. You will read below, how Scene Exposure Region can be used to give the camera a hint on what to set the exposure to when faces are not present |
|
Scene Prioritized |
Camera exposure is optimized for entire scene. When in this mode, camera does not adjust exposure based on presence of faces in the video. Exposure is optimized for the entire scene. While this mode is useful for creating an optimal video recording of entire scene, it will not optimize exposure to the face and thus have negative impact on face recognition. |
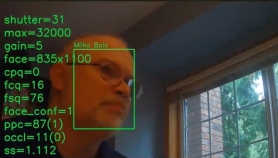
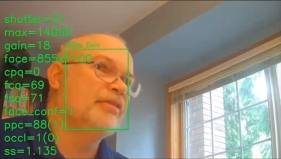
Example with strong backlight
|
Scene Prioritized |
Face Prioritized |
|
|
|
5.3.6.2 SCENE EXPOSURE REGION
Determines the camera exposure when no face is present in the view of the camera. This setting allows you to give a hint to the camera to set exposure when no faces are in view. This is done by selecting a region of the video to set exposure. Possible values are:
- Top 25%
- Top 35%
- Top 50%
- Center
- Bottom 50%
- Bottom 35%
- Bottom 25%
- Custom
Setting this value to the exposure of where faces will appear in the video will reduce the amount of time I takes for the camera to adjust exposure for the face. When set incorrectly, SAFR SCAN will take a long time to find a face or may not even find a face at all in the video (i.e. no event shows up I the Live view).
Recommendation: Target an dark surface area such as bushes, trees or the ceiling of an overhang where the sun will not shine directly. Avoid directly illuminated by the sun or the sky.
Examples
Incorrect Settings - Exposure zone set to region of strong backlight
|
Face not in view |
Face in view |
|
|
|
The problem is that the camera has to adjust from a very dark exposure to a very bright exposure to let sufficient light in to properly light the face. This takes a few hundred milliseconds. For fast moving objects, you may lose precious moments to perform recognition.
Correct Settings - Exposure zone set to region of similar lighting
|
Face not in view |
Face in view |
|
|
|
?Use Scene Exposure mode with face in view to chose which region offers the best exposure on the face. Adjust the region, including custom if needed, until the face is well lit. Then change exposure mode back to Face Prioritized.
Default value for Scene Exposure Region is Bottom 35%. This is most often the optimal location but may not work if floor is brightly lit from outdoor reflection.
5.3.6.3 Exposure Level
Allows the exposure to be boosted or attenuated from what the camera considers optimal. This value can be as high as 400% (4x brighter) or as low as 25% (4x darker). It is recommended to leave this at 100%, but the setting may be modified if SAFR is consistently incorrectly setting exposure.
5.3.6.4 Exposure Adjust Speed
Controls speed at which the camera adjusts exposure. Default is 72%. Values greater than 72% reduces the time it takes for the camera to adjust exposure. Decreasing this value increases the time it takes to adjust exposure.
Increasing this value too far may result in "yo-yo effects". That is, due to the speed of adjustment, the camera may overshoot and oscillate the exposure back and forth.
Adjusting this value may be useful in case where faces are moving very fast through the view. If the person is moving too fast, the camera may end up adjusting exposure for a face that is no longer present in that location. Speeding up the Exposure Adjust Speed may help in this case or slowing it down may avoid adjusting exposure too quickly and keeps exposure.
5.3.6.5 Backlight Compensation
SAFR Camera is designed to compensate for backlight conditions. Backlight Compensation setting provide some control over that feature. Possible values are:
- Auto
- Slight backlight ( outdoors)
- Medium backlight ( outdoors )
- Medium strong backlight (typical outdoors)
- Strong backlight (indoors / outdoors )
- Very strong backlight (typical indoors)
- Extreme backlight ( indoors)
Auto mode attempt to adjust exposure under typical conditions. Other options allow you to provide a hint to the camera as to the type of conditions it is facing which will improve its ability to handle those conditions.
Backlight Compensation primarily manages the shutter speed. Shutter speed is also controlled by the Minimum and Maximum Shutter Speed settings. SAFR Camera handles these settings by applying the setting that imposes the greatest constraint. For example, if Maximum Shutter Speed is set below what the Backlight Compensation setting would set for the current conditions, then the Maximum Shutter Speed will be applied.
5.3.6.6 Maximum Shutter Speed
Max Shutter speed is one of the tools to use to handle backlighting. Faster Shutter speeds will decrease light allowed into the camera and thus darken the view. Setting Max Shutter Sped prevents the camera from darkening the face image too much due to bright background.
5.3.6.7 Minimum Shutter Speed
Lower shutter speed results in motion blur. Setting a higher minimum shutter speed can reduce or prevent motion blur.
Normally you want the minimum shutter speed to be as low as possible to increase exposure (light on the face).
At 1/120 you will typically not get motion blur. But at this speed, you may have insufficient light.
5.3.6.8 Max Gain
When the lighting gets reduced, the camera applies more gain to the image. Higher gain adds noise to the image. This results in faces looking grainy due to the noise in the signal resulting from the gain. To control noise, you can limit the Max gain setting. But by doing this, you reduce the brightness. Gain should only be adjust once improvements from adjustment of shutter speed and iris have been exhausted.
5.3.6.9 White Light / White Light level
Controls the white light mode (Auto, On and Off) and the brightness level. In Auto mode, SAFR SCAN will evaluate if white light is needed and turn on automatically if there is insufficient lighting on the face. To avoid a harsh transition, white lights will gradually fade in. This may even occur in a well lit room if there is very strong backlight.
5.3.6.10 Night Vision / IR Light Level
Controls the IR mode (Auto, On and Off) and the brightness level. In Auto mode, IR is turned only when insufficient light exists in the environment. This allows the face to be detected even in very dim or zero light environments. Once detected, the white lights may be used to facilitate face matching.
5.3.7 Image
Image settings offers features to control the picture. Image settings involve digital processing and should be reserved only when desired results cannot be achieved with Camera Settings. See Image Settings below for information about settings in this page.
The sliders in this section allow you to adjust the camera video feed so that faces appearing in the camera view are more visible, thus facilitating face recognition. Of the 4 available settings, contrast usually has the most effect on face recognition success.
Note that it’s much, much better to improve the environmental conditions rather than using the sliders in this section. Improving the light, as well as optimizing the SAFR SCAN device camera’s position, will yield better results than adjusting these sliders. In fact, in most scenarios users won’t need to adjust these sliders at all.
5.3.8 Display
5.3.8.1 Display Mode
Specifies when the SAFR SCAN device’s video region displays the device’s camera feed. There are three possible options:
- Activate when face is detected – Display shows Display background when active setting when a face is detected within Activation distance.
- Always on – Display always shows “Display background when active”
- Always off – Display will always show Display image when inactive setting.
Note: On screen text feedback will always show unless separately disabled.
Some users prefer not to see video of themselves as they interact with the reader. There are two ways to accomplish this:
- Set Display Mode (this setting) to “Always off”. The screen will always display the Display image when inactive setting which can be a logo or other options (See below).
- Set Display background when active to any value other than “Live video”
5.3.8.2 Activation distance
Control how far away someone is when screen activates. Possible values are:
- About 0.7 meters
- About 0.9 meters
- About 1.3 meters (default)
- About 2.0 meters
- About 2.7 meters
To control how far away someone is before SCAN will authenticate use Advanced Feed Configuration. This requires connection to SAFR Server so is best performed after reviewing SAFR Desktop documentation.
- Open SAFR Desktop
- Click on Tools and select Video Feeds Window
- Locate the SAFR SCAN device you wish to edit
- Select “…” menu to the right of the SAFR SCAN device Feed
- Select “Advanced Feed Configuration”
- Click “+Add” in upper right
- Search for and select recognizer.minimum-face-size
- Click Add
- Change the value to your desired distance. Value should be specified in pixels. Equivalent distances are provided below:
- 20px - 9.5' (max range)
- 100px - 4.5 ft
- 150px – 36”
- 180px – 34”
- 250px - 25”
- 300px - 17”
- 350px– 14”
- 400px - 12"
5.3.8.3 Display brightness
The SAFR SCAN device’s video region’s brightness.
5.3.8.4 Display background when active
Behavior of this setting depends on the value set in Display Mode described above.
- If Display Mode is “Active when face is detected”, then this setting defines what is displayed when face is present and within Activation distance.
- If Display Mode is “Always active”, then display always shows this setting.
- If Display Mode is “Always inactive”, then display never shows this setting (instead shows inactive state described below).
Possible values are:
- Live video (default)
- Solid black
- Solid white
- Custom solid color
This setting is closely related to Display image when inactive described next.
5.3.8.5 Display image when inactive
Defines what to display when no faces are present.
- Disabled – Screen is off when no faces present.
-
SAFR Logo – The SAFR SCAN logo is displayed when no faces present.

-
Face Recognition Prompt – Following image displayed when no faces present.

-
Card Scan Prompt – Following image displayed when no faces present. This is useful to guide users to where card should be tapped.

- Custom - A custom image is displayed when no faces present. This can be your company logo.
5.3.8.6 Display info when active and Display info text color
Provides a way to customize on screen text when faces are present and the color of the text. Options are:
- Disabled
- Time of Day to a minute
- Time of Day to a second
- Date and Time
- Device IP address
- Custom (fixed string)
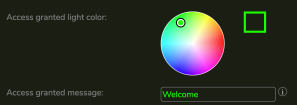
5.3.8.7 Customizing LED and Text
The LED Ring color and on-screen display text can be customized for the following user prompts:
- Access Granted
- Access Denied
- Checked in
- Checked out
- Tailgating
- Waiting on 2nd or 3rd Factor
For each, the LED Ring color and message text is customized using following controls:
5.3.8.8 Message Prompts
The message text for following prompts can also be configured:
- Scan card – Shown when face has been detected and device is awaiting access card as 2nd factor. This field is only relevant when SAFR SCAN has been configured to require two factor authentication.
- Send credential – Shown when face has been detected and device is awaiting mobile credential as 2nd factor. This field is only relevant when SAFR SCAN has been configured to require two factor authentication.
- Check in/out prompt – Shown when face is detected and device is awaiting a check in or check out action
For each of the prompt, dynamic tokens can be inserted into the message string. Available tokens are: firstName, lastName, firstInitial, lastInitial, and time.
And three other prompts can be customized but do not have dynamic tokens:
- Enter code – Shown when PIN code is expected.
- Face too far
- Face too close
5.3.8.9 Keypad Controls
Keypad layout sets the keypad style (normal, scramble or scramble on each key press)
Keypad code size controls number of digits required for the PIN code.
5.3.9 Sound
Settings on this page allow control over the audible user feedback.
5.3.9.1 Sound control
- Sound output allows sound to be enabled or disabled
- Sound volume allows sound level to be controlled.
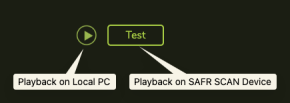
5.3.9.2 Sound message
Select the spoken text or sound to play when each respective action occurs.
For each sound prompt, you can test the audio on local PC and on SCAN using the respective buttons:
5.4 System Settings
5.4.1 SAFR Server
Specifies the SAFR Server, if any, that SAFR Camera is connected & managed by.
⚠️ if SAFR Camera is managed by a SAFR Server, many of SAFR Camera’s settings won't be locally configurable anymore; they'll only be configurable via the SAFR Server.
There are four possible values for the SAFR Server field.
- None: SAFR SCAN isn't connected to a SAFR Server.
- SAFR Server: SAFR Camera is connected to a locally deployed (i.e. an on-premises) SAFR Server.
- SAFR Cloud: SAFR Camera is connected to a SAFR Server in the cloud.
-
Custom: SAFR Camera is connected to a locally deployed SAFR Server that has custom SAFR service endpoints. There are two scenarios where you might want to use custom SAFR service endpoints:
- The SAFR Server has custom domain names for each service endpoint.
- You want to use an unsecure HTTP connection, rather than the default HTTPS connection. We do not recommend using HTTP connections, but this may be useful in debugging.
5.4.2 Behavior when Connected to SAFR Server
5.4.2.1 Persons
When you connect to SAFR Server, the local faces database on SAFR Camera will be combined with face database on SAFR Server. If SAFR finds that two face are similar, those faces will be automatically merged into a single identify. See Software SAFR Administration Guide for information on merging and unmerging faces.
5.4.2.2 Events
Events will be uploaded from SAFR Camera to SAFR Server. This occurs in real time. Events will typically appear on SAFR Server within milliseconds of being created and will be updated in real time.
If networking between SAFR Camera and SAFR Server is unavailable, events will be cached on SAFR Camera until the connection is restored. When connection is restored, cached events will be uploaded to SAFR Server and cleared from local cache. SAFR Camera is capable of storing the latest 2,000 events with images and up to 28,000 more most recent events without images.
5.4.2.3 Configuration
When connected to SAFR Server, many of the configuration can be modified on the connected SAFR Server. Use SAFR Server Web Console or SAFR Desktop to manage those settings.
5.4.3 Video Streams
Configure and manage the video stream profiles produced by the camera.
5.4.4 Network
Manually configure the device's network settings.
Note: SAFR automatically configures its network settings when the device is first turned on and contacts a DHCP server. However, you can manually configure your device's network settings here if you need to override the DHCP server.
5.4.5 Card Format
Defines the card format that SAFR SCAN uses for internal card reader on SC200 models and the default card format that applies to all person records when transmitting credentials to the panel.
5.4.6 Multiple Card Support
SAFR SCAN supports multiple access cards. Each card has a facility code, card number and card format. When multiple access cards are defined, cards are defined in a specific order. The first is defined as primary and all other formats as secondary.
Primary card is used when using face or keypad authentication modes where the credentials are not known. For modes in which a facility and card id is received (face or QR code), multiple card format definitions are handled as follows:
- For reading cards using SCAN’s internal reader or using an external card reader, the correct card definition is selected based on the number of bits in the card format. For this reason, 2 card formats should not be defined with the same number of bits (if so, the first one in the list will always be used).
- For sending credentials to the panel, the card format that matches the credentials received are used. This only applies to access modes where credentials are taken as input (internal card reader, external card reader or QR Code)
5.4.7 OSDP
Enable OSDP connections. Note that if you don’t enable OSDP connections here, then OSDP connections won’t work even if OSDP connectors are plugged into the back of the SAFR SCAN device.
OSDP connection to Control Panel: Enables the OSDP OUT A/+ and OSDP OUT B/- pins on the SAFR SCAN Device, which are used to connect a physical access control (PAC) panel. When a user is authenticated, SAFR SCAN will send their credentials to the connected PAC panel, causing the door the PAC panel controls to unlock.
OSDP connection to Card Reader: Enables the OSDP IN A/+ and OSDP IN B/- pins on the SAFR SCAN Device, which are used to connect OSDP-capable authentication devices. Card readers are most commonly used, but you could also connect other devices such as fingerprint readers. When a user successfully uses the device to authenticate, the device will send their credentials to SAFR SCAN.
5.4.8 Wiegand
Enable Wiegand connections. Note that if you don’t enable Wiegand connections here, then Wiegand connections won’t work even if Wiegand connectors are plugged into the back of the SAFR SCAN device.
Wiegand connection to Control Panel: Enables the WIEG OUT EXT0 and WIEG OUT EXT1 pins on the SAFR SCAN Device, which are used to connect a physical access control (PAC) panel. When a user is authenticated, SAFR SCAN will send their credentials to the connected PAC panel, causing the door the PAC panel controls to unlock.
Wiegand connection to Card Reader: Enables the WIEG IN EXT0 and WIEG IN EXT1 pins on the SAFR SCAN Device, which are used to connect Wiegand-capable authentication devices. Card readers are most commonly used, but you could also connect other devices such as fingerprint readers. When a user successfully uses the device to authenticate, the device will send their credentials to SAFR SCAN.
5.4.9 Door strike relay
Manage the use of relays. Note that if you don’t enable relay connections here, then relay connections won’t work even if you physically connect a relay to the SAFR SCAN device.
Electric door strike relay: Enables the RELAY NO, RELAY NC, and RELAY COM pins on the SAFR SCAN Device. These pins are used to connect relays to the SAFR SCAN device. When a user is authenticated, SAFR SCAN will activate a connected relay for the time specified in the Relay activation duration field below.
Relay activation duration: Specifies how long the connected relay should be activated. When the relay is controlling an electronic door, which is the most common use case, this setting effectively specifies how long the door will remain unlocked.
5.4.10 Date and Time
Settings to configure NTP time synchronization server or manually set the device's date and time.
5.4.11 Update
Allows you to update both the SAFR SCAN software and the SAFR SCAN device's firmware to the latest versions. If available, SAFR will get updates directly from SAFR update server. If not, firmware can be downloaded from http://safr.real.com/firmware.
5.4.12 Reset
Allows you to either reboot the SAFR SCAN device or reset its settings to their default values.
There's no need to reboot or reset your SAFR SCAN device during the normal operation of your device, but rebooting or resetting the device can be useful if you encounter an unexpected behavior while operating the device.
5.5 Security Settings
5.5.1 System Login
The login credentials to be used to log in to SAFR Camera. This is where you can change the password.
5.5.2 Video RTSP Access
When video RTSP access is enabled, remote connections are able to view SAFR Camera’s camera feed in realtime. This is disabled by default because remote viewing isn't necessary or appropriate for most access control use cases.
5.5.3 SSL
Allows you to manually configure your SSL (Secure Sockets Layer) settings.
Upon 1st connection, you may be presented with a security warning due to the use of a self-signed CERT installed on the device. This is expected. This is a valid CERT but cannot be verified by browsers because it was not signed by a publicly trusted certificate authority.
To improve security a new self-signed CERT should be generated. This will overwrite the default self-signed CERT that SAFR SCAN ships with. Using default self-signed CERT holds a risk because the same private key used to decrypt the messages is installed on every SAFR SCAN device shipped from the factory.
To avoid the warning and operate in the highest security mode, a CERT from a valid certificate authority can be installed.
5.5.4802.1 x
Allows you to enable 802.1x authentication.
5.5.5 Firewall
Allows you to manually configure your firewall settings.
6 Troubleshooting
This section describes some of the common issues and how to resolve them.
Face match but no Access Granted
Symptom: Faces are not being matched (appear as “Stranger” or “Unrecognizable” on event in Live View) or are matched but not authenticated preventing access granted.
If strong lighting exists, switch to manual mode for backlight compensation as follows:
- Open SAFR SCAN Settings Operation Page.
- Change “Backlight Compensation” from “Auto” to one of the manual options.
- Check if authorization improves and try other settings if not.
Ensure reader is not mounted behind glass. 3D face verification will fail if the reader is placed behind glass. This results in blocking the infrared signal preventing proper operation for liveness verification.
Access Granted but panel does not unlock door
Symptom: You have connected SAFR SCAN to the panel via Wiegand or OSDP but upon getting Access Granted in SAFR SCAN the door does not unlock.
If strong lighting exists, switch to manual mode for backlight compensation as follows:
- Open SAFR SCAN Settings Operation Page.
- Change “Backlight Compensation” from “Auto” to one of the manual options.
- Check if authorization improves and try other settings if not.
|
Product Login |
SAFR Helpdesk |
|
|
For product downloads, go to http://safr.real.com/products. For more information, go to http://support.safr.com or email us at support@safr.com. |
|
|
TroubleshootingPage 1 of 51

