
Objective
Prerequisites
Step-by-Step Process
The process listed below outlines the steps to perform the migration of a SAFR environment with SAFR devices (SAFR SCAN, SAFR Cameras) from one server to another.
Prerequisites
Please confirm the following before proceeding with migrating SAFR Server from one machine to another:
- The old server needs to be at the same version level as the new server. This is to ensure that the backup is fully compatible from the old to the new server.
- If you have SAFR SCAN or SAFR Camera devices connected, ensure the old server stays connected to SAFR devices throughout the process. This allows for a minimal outage period, as the devices will only be moved from the old server to the new one when both are ready.
This process leverages the SAFR backup/restore scripts which cause the SAFR Person IDs to remain the same. This is key to preventing duplicates records on the new system when SAFR SCAN is connected with existing identities to the new server.
Step-by-Step Process
- Run the program backup.exe located in “C:\Program Files\RealNetworks\SAFR\bin\”.
- Confirm the creation of the backup, located in "C:\Program Files\RealNetworks\SAFR-Backup\"
- Copy that backup to the new machine.
- As additional backup, export all faces from the SAFR Desktop People window.
- Go to the “…” menu in upper right and click “Export”. Then select “SIFF” as file format.
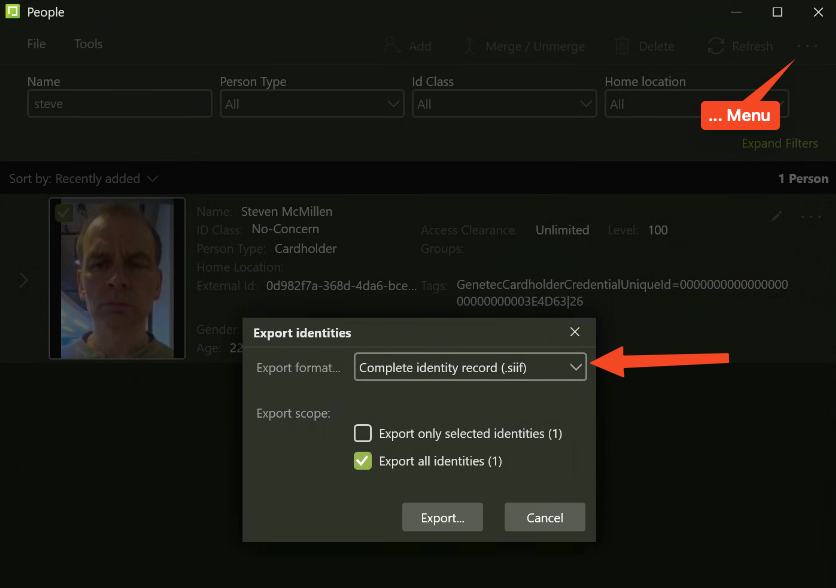
- Go to the “…” menu in upper right and click “Export”. Then select “SIFF” as file format.
- Disable License Updates, which is necessary to allow the installation of SAFR on the new server.
- The old server will run for 1 week this way.
- Use the Windows\System32\drivers\etc\hosts file to prevent SAFR Server from updating its license.
- Ask the SAFR Support team to Reset HW Binding for the SAFR SCAN license so that it can be reattributed in the new server.
- Download and install SAFR on the new PC.
- Sign into SAFR Server on new PC.
- Restore the backup.
- “C:\Program Files\RealNetworks\SAFR\bin\backup.exe” “C:\Program Files\RealNetworks\SAFR-Backup\ "
- Migrate devices one at a time from the old server to the new one, with both servers still active.
- Open the Web Console of the device.
- IMPORTANT: To avoid duplicates when connecting to new server:
- Go to System > Reset
- Uncheck "Keep Enrolled People & System Login"
- Click "Factory Reset"
- Go to System > SAFR Server.
- Click “Edit Server connection settings”.
- Enter the IP Address for the new SAFR Server.
- Check person records for issues and duplicates.
- Reconfigure the sync with Genetec and confirm once more that there are no duplicates.